Assignment 5: HTTP Web Proxy and Cache
This handout was adapted from Jerry Cain’s Spring 2018 offering.
Your penultimate CS110 assignment has you implement a multithreaded HTTP proxy and cache. An HTTP proxy is an intermediary that intercepts each and every HTTP request and (generally) forwards it on to the intended recipient. The servers direct their HTTP responses back to the proxy, which in turn passes them on to the client. In its purest form, the HTTP proxy is little more than a nosy network middleman that reads and propagates all incoming and outgoing HTTP activity.
Here’s the neat part, though. When HTTP requests and responses travel through a proxy, the proxy can control what gets passed along. The proxy might, for instance, do the following:
- Block access to social media products – sites like Facebook, Instagram, Twitter, and LinkedIn.
- Block access to large documents, like videos and high-definition images, so that slow networks don’t become congested and interfere with lightweight services like email and instant messaging. (If you’ve ever used internet on a plane, many use proxies that do things like this.)
- Block access to all web sites hosted in Canada. You know, as payback for Justin Bieber.
- Strip an HTTP request of all cookie and IP address information before forwarding it to the server as part of some larger effort to anonymize the client.
- Cache the HTTP responses to frequently requested, static resources that don’t change very often so it can respond to future HTTP requests for the same exact resources without involving the origin servers.
- Redirect the user to an intermediate paywall to collect payment for wider access to the Internet, as some airport and coffee shop WiFi systems are known for.
Due: Wednesday, August 8th at 11:59 p.m.
Getting started
Go ahead and clone the git repository we’ve set up for you by typing:
git clone /usr/class/cs110/repos/assign5/$USER assign5
Compile often, test incrementally and almost as often as you compile, run
./tools/sanitycheck, and run ./tools/submit when you’re done.
If you descend into your assign5 directory, you’ll notice a subfolder called
samples, which itself contains a symlink to a fully operational version
called proxy_soln. You can invoke the sample executable without any
arguments, as with:
$ ./samples/proxy_soln
Listening for all incoming traffic on port <port number>.
The port number issued depends on your SUNet ID, and with very high
probability, you’ll be the only one ever assigned it. If for some reason
proxy says the port number is in use, you can select any other port number
between 2000 and 65535 (I’ll choose 12345 here) that isn’t in use by typing:
$ ./proxy_soln --port 12345
Listening for all incoming traffic on port 12345.
In isolation, proxy_soln doesn’t do very much. In order to see it work its
magic, you should download and launch a web browser that allows you to appoint
a proxy for HTTP traffic. I’m recommending you use
Firefox, because I’ve used it for
five years now to specifically exercise proxy, and it has worked very well
for me. Once you download and launch Firefox, you can configure it (on Macs)
to connect to the Internet through proxy by launching Preferences from
the Apple menu, scrolling all the way to the bottom to Network Proxy, click
on the Setting button, and then activating a manual proxy as I have in this
screenshot. (On Windows, proxy settings can be configured similarly).
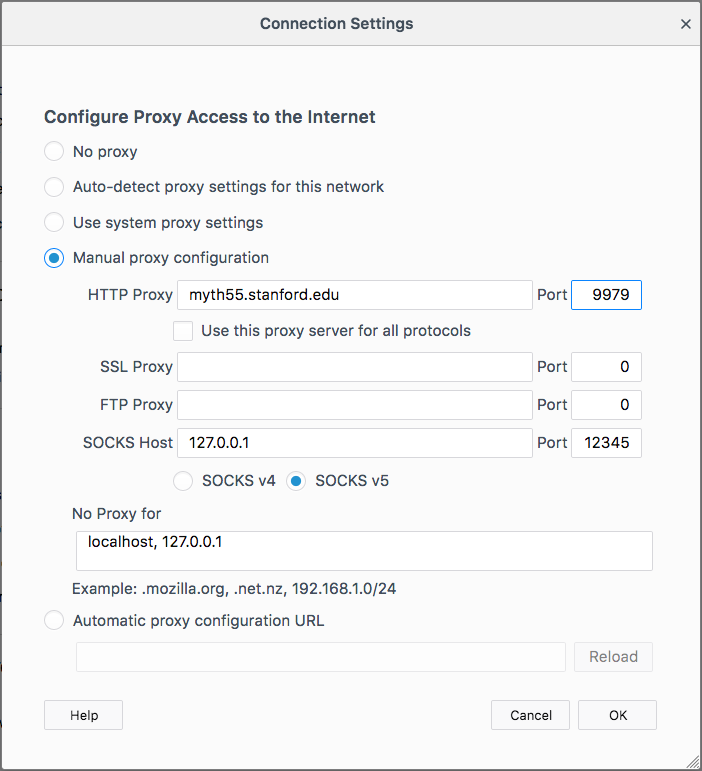
You should enter the myth machine you’re working on (and you should get in
the habit of ssh‘ing into the same exact myth machine for the next week
so you don’t have to continually change these settings), and you should enter
the port number that your proxy is listening to.
You can, of course, use whatever web browser you want to, but I’m recommending Firefox for a few reasons. Here are two of them:
- Some other browsers don’t allow you to configure browser-only proxy settings, but instead prompt you to configure computer-wide proxy settings for all HTTP traffic – for all browsers, Dropbox and/or iCloud synchronization, iTunes downloads, and so forth. You don’t want that level of interference.
- I suspect most of you don’t use Firefox by default, so you won’t need to manually toggle proxy settings on and off to surf the Internet using whatever browser it is you normally use. Firefox can be your CS110 browser for this assignment cycle, and Chrome, Safari, Internet Explorer or whatever it is you use normally can be your default. (If you use Firefox as your primary browser, as I do, then I’m sorry, this is actually a bit annoying. My recommendation is to launch a second Firefox profile so that you can run two Firefox instances at the same time, and configure the second to use the proxy.)
If you’d like to start small and avoid the browser, you can use curl from
your own machine (or from another myth) to exercise your proxy. An example
command might be the following:
curl --proxy http://myth55.stanford.edu:9979 http://icanhazip.com
(This assumes your proxy is listening on port 9979, which is probably not the case – it depends on your sunetID.)
Instructions for off-campus students
As was the case with Assignment 4, if you want to use your browser with the proxy and you’re located off campus, you may need to do some extra work.
You have several options:
- You can use
curlto download web pages, as illustrated above. This is the easiest quick fix, but it will be much nicer for later milestones to have a full-on web browser. Use an SSH proxy. SSH has a feature that allows us to send traffic to an SSH server, and it will forward that traffic to a web server. If we SSH into a Stanford computer, we can then use that computer to forward web requests to your
proxyserver.- Launch
proxy. Let’s say my server is listening onmyth55port9979. - Open an extra terminal window and
ssh -L 9979:myth55.stanford.edu:9979 rice.stanford.edu. Leave this running on the side. (Make sure this is running in a separate terminal window from the one you’re using to connect to myth, and make sure it continues running while you try to useproxywith your browser.) You should replacemyth55with whatever serverproxyis running on. - Configure your browser proxy settings to use
localhost:9979as an HTTP proxy.
This method might be a little annoying if you have a bad network or frequently sleep your computer (logging into
ricerequires 2 factor authentication), but it is probably the easiest way to be able to use your browser withproxy.By the way, you may be wondering, why not use SSH into
mythand have myth forward the traffic toarchive– why userice? That would definitely be more familiar and straightforward, but unfortunately,mythhas SSH tunneling disabled.- Launch
Connect to the campus network using a VPN; instructions are here. If you feel like taking the time to install the VPN client and get everything set up, then this will probably be the easiest option in the long run. (I haven’t taken the effort to set it up, though, so I can’t really tell you what it’s like.)
Implementing v1: Sequential proxy
Your final product should be a multithreaded HTTP proxy and cache that blocks access to certain domains. As with all nontrivial programs, we’re encouraging you to work through a series of milestones instead of implementing everything in one extended, daredevil coding binge. You’ll want to read and reread Sections 11.5 and 11.6 of your B&O textbook to ensure a basic understanding of the HTTP protocol.
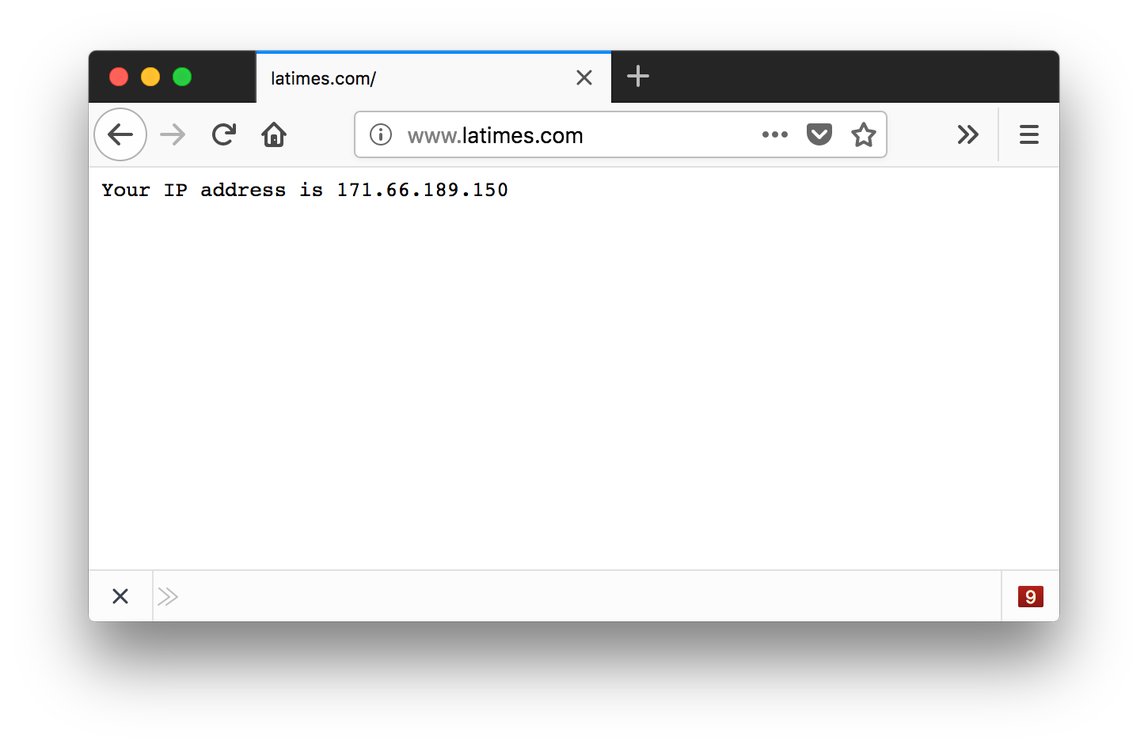
For the v1 milestone, you shouldn’t worry about threads or caching. You should
transform the initial code base into a sequential but otherwise legitimate
proxy. The code you’re starting with responds to all HTTP requests with a
placeholder status line consisting of an HTTP/1.0 version string, a status
code of 200, and a curt OK reason message. The response includes an
equally curt payload announcing the client’s IP address. Once you’ve configured
your browser so that all HTTP traffic is directed toward the relevant port of
the myth machine you’re working on, go ahead and launch proxy and start
visiting any and all web sites. Your proxy should at this point intercept
every HTTP request and respond with this (with a different IP address, of
course):
For the v1 milestone, you should upgrade the starter application to be a true
proxy – an intermediary that ingests HTTP requests from the client,
establishes connections to the origin servers (which are the machines for which
the requests are actually intended), passes the HTTP requests on to the origin
servers, waits for HTTP responses from these origin servers, and then passes
those responses back to the clients. Once the v1 checkpoint has been
implemented, your proxy application should basically be a busybody that
intercepts HTTP requests and responses and passes them on to the intended
servers.
Each intercepted HTTP request is passed along to the origin server pretty much as is, save for three small changes.
You should modify the intercepted request URL within the first line – the request line as it’s called – as needed so that when you forward it as part of the request, it includes only the path and not the protocol or the host. The request line of the intercepted HTTP request should look something like this:
GET http://www.latimes.com/books/ HTTP/1.1Of course,
GETmight be any one of the legitimate HTTP method names, the protocol might beHTTP/1.0instead ofHTTP/1.1, and the URL will be any one of a jillion. But provided your browser is configured to direct all HTTP traffic through your proxy, the URLs are guaranteed to include the protocol (e.g. the leadinghttp://) and the host name (e.g.www.latimes.com). The protocol and the host name are included whenever the request is directed to a proxy, because the proxy would otherwise have no clue where the forwarded HTTP request should go. When you do forward the HTTP request to the origin server, you need to strip the leadinghttp://and the host name from the URL. For the specific example above, the proxy would need to forward the HTTP request on towww.latimes.com, and the first line of that forwarded HTTP request would need to look like this:GET /books/ HTTP/1.1I’ve implemented the
HTTPRequestclass to manage this detail for you automatically (inspect the implementation ofoperator<<inrequest.ccand you’ll see), but you need to ensure that you don’t break this as you start modifying the code base.You should add a new request header entity named
x-forwarded-protoand set its value to behttp. Ifx-forwarded-protois already included in the request header, then simply add it again.You should add a new request header entity called
x-forwarded-forand set its value to be the IP address of the requesting client. Ifx-forwarded-foris already present, then you should extend its value into a comma-separated chain of IP addresses the request has passed through before arriving at your proxy. (The IP address of the machine you’re directly hearing from would be appended to the end).
Most of the code you write for your v1 milestone will be confined to
request-handler.h and request-handler.cc files (although you’ll want to
make a few changes to request.h/cc as well). The HTTPRequestHandler
class you’re starting with has just one public method, with a placeholder
implementation.
You need to familiarize yourself with all of the various classes at your
disposal to determine which ones should contribute to the v1 implementation. I
repeat: You need to familiarize yourself with all of the various classes at
your disposal to determine which ones should contribute to the v1
implementation. Of course, you’ll want to leverage the client socket code
presented in lecture to open up a connection to the origin server. Your
implementation of the one public method will evolve into a substantial amount
of code – substantial enough that you’ll want to decompose and add a good
number of private methods.
Once you’ve reached your v1 milestone, you’ll be the proud owner of a
sequential (but otherwise fully functional) proxy. You should visit every
popular web site imaginable to ensure the round-trip transactions pass through
your proxy without impacting the functionality of the site (caveat: see the
note below on sites that require login or are served up via HTTPS). Of course,
you can expect the sites to load very slowly, since your proxy has this much
parallelism: zero. For the moment, however, concern yourself with the
networking and the proxy’s core functionality, and worry about improving
application throughput in later milestones.
Important note: Your proxy doesn’t need to work for HTTPS websites; speaking HTTPS is more complex than what we have presented so far. (Part of the goal of HTTPS is to prevent tampering from middlemen, which is exactly what your proxy tries to do.) HTTP websites are becoming more sparse (a good thing for web security, but bad for debugging purposes). However, many top websites still don’t use HTTPS. See the “Other top sites” section from this site list, and look for sites that are marked as not working on HTTPS or not defaulting to HTTPS.
If, once you get the entire proxy working for submissions purposes, you’re interested in HTTPS proxying, drop me an email and I’ll send you a description of how to upgrade your proxy to be able to intercept some HTTPS traffic.
Implementing v2: Sequential proxy with blacklisting, caching
Once you’ve built v1, you’ll have constructed a genuine HTTP proxy. In practice, proxies are used to either block access to certain web sites, cache static resources that rarely change so they can be served up more quickly, or both.
Why block access to certain web sites? There are several reasons, and here are a few:
- Law firms, for example, don’t want their attorneys surfing Yahoo, LinkedIn, or Facebook when they should be working and billing clients.
- Parents don’t want their kids to accidentally trip across a certain type of web site.
- Professors configure their browsers to proxy through a university intermediary that itself is authorized to access a wide selection of journals, online textbooks, and other materials – all free of charge – that shouldn’t be accessible to the general public. (This is the opposite of blocking, I guess, but the idea is the same).
- Some governments forbid their citizens to visit Facebook, Twitter, The New York Times, and other media sites.
- Microsoft IT might “encourage” its employees to use Bing by blocking access to other search engines during lockdown periods when a new Bing feature is being tested internally.
Why should the proxy maintain copies of static resources (like images and JavaScript files)? Here are two reasons:
- The operative adjective here is static. A large fraction of HTTP responses are dynamically generated – after all, the majority of your Facebook, LinkedIn, Google Plus, and Instagram feeds are constantly updated – sometimes every few minutes. HTTP responses providing dynamically generated content should never be cached, and the HTTP response headers are very clear about that. But some responses – those serving images, JavaScript files, and CSS files, for instance – are the same for all clients, and stay the same for several hours, days, weeks, months – even years! An HTTP response serving static content usually includes information in its header stating the entire thing is cacheable. Your browser uses this information to keep copies of cacheable documents, and your proxy can too.
- Along the same lines, if a static resource – the omnipresent Google logo, for instance – rarely changes, why should a proxy repeatedly fetch the same image over and over again an unbounded number of times? It’s true that browsers won’t even bother issuing a request for something in its own cache, but users clear their browser caches from time to time (in fact, you should clear it very, very often while testing), and some HTTP clients aren’t savvy enough to cache anything at all. By maintaining its own cache, your proxy can drastically reduce network traffic by serving up cached copies when it knows those copies would be exact replicas of what it’d otherwise get from the origin servers. In practice, web proxies are on the same local area network, so if requests for static content don’t need to leave the LAN, then it’s a win for all parties.
In spite of the long-winded defense of why caching and blacklisting are
reasonable features, incorporating support for each is relatively
straightforward, provided you confine your changes to the request-handler.h
and .cc files. In particular, you should just add two private instance
variables – one of type HTTPBlacklist, and a second of type HTTPCache to
HTTPRequestHandler. Once you do that, you should do this:
Update the
HTTPRequestHandlerconstructor to construct the embeddedHTTPBlacklist, which itself should be constructed from information inside theblocked-domains.txtfile. The implementation ofHTTPBlacklistrelies on the C++11regexclass, and you’re welcome to read up on the regular expression support they provide. You’re also welcome to ignore theblacklist.ccfile altogether and just use it.Your
HTTPRequestHandlerclass would normally forward all requests to the relevant original servers without hesitation. But, if your request handler notices the origin server matches one of the regexes in theHTTPBlacklist-managed set of verboten domains, you should immediately respond to the client with a status code of 403 and a payload ofForbidden Content. Whenever you have to respond with your own HTML documents (as opposed to ones generated by the origin servers), just go with a protocol ofHTTP/1.0.You should update the
HTTPRequestHandlerto check the cache to see if you’ve stored a copy of a previously generated response for the same request. TheHTTPCacheclass you’ve been given can be used to see if a valid cache entry exists, repackage a cache entry intoHTTPResponseform, examine an origin-server-providedHTTPResponseto see if it’s cacheable, create new cache entries, and delete expired ones. The current implementation ofHTTPCachecan be used as is – at least for this milestone. It uses a combination of HTTP response hashing and timestamps to name the cache entries, and the naming schemes can be gleaned from a quick gander through thecache.ccfile.Your to-do item for caching? Before passing the HTTP request on to the origin server, you should check to see if a valid cache entry exist. If it does, just return a copy of it – verbatim! – without bothering to forward the HTTP request. If it does not, then you should forward the request as you would have otherwise. If the HTTP response identifies itself as cacheable, then you should cache a copy before propagating it along to the client.
What’s cacheable? The code I’ve given you makes some decisions – technically off specification, but good enough for our purposes – and implements pretty much everything. In a nutshell, an HTTP response is cacheable if the HTTP request method was
GET, the response status code was 200, and the response header was clear that the response is cacheable and can be cached for a reasonably long period of time. You can inspect some of theHTTPCachemethod implementations to see the decisions I’ve made for you, or you can just ignore the implementations for the time being and use theHTTPCacheas an off-the-shelf.
Once you’ve hit v2, you should once again pelt your proxy with oodles of
requests to ensure it still works as before, save for some obvious differences.
Web sites matching domain regexes listed in blocked-domains.txt should be
shot down with a 403, and you should confirm your proxy’s cache grows to
store a good number of documents, sparing the larger Internet from a good
amount of superfluous network activity. (Again, to test the caching part, make
sure you clear your browser’s cache a whole bunch.)
Implementing v3: Concurrent proxy with blacklisting and caching
You’ve implemented your HTTPRequestHandler class to proxy, block, and cache,
but you have yet to work in any multithreading magic. For precisely the same
reasons threading worked out so well with your Internet Archive program,
threading will work miracles when implanted into your proxy. Virtually all
of the multithreading you add will be confined to the scheduler.h and
scheduler.cc files. These two files will ultimately define and implement an
über-sophisticated HTTPProxyScheduler class, which is responsible for
maintaining a list of socket/IP-address pairs to be handled in FIFO fashion by
a limited number of threads.
The initial version of scheduler.h/.cc provides the lamest scheduler ever:
It just passes the buck on to the HTTPRequestHandler, which proxies, blocks,
and caches on the main thread. Calling it a scheduler is an insult to all
other schedulers, because it doesn’t really schedule anything at all. It just
passes each socket/IP-address pair on to its HTTPRequestHandler underling and
blocks until the underling’s serviceRequest method sees the full HTTP
transaction through to the last byte transfer.
One extreme solution might just spawn a separate thread within every single
call to scheduleRequest, so that its implementation would go from this:
void HTTPProxyScheduler::scheduleRequest(int connectionfd,
                                         const string& clientIPAddress) {
  handler.serviceRequest(make_pair(connectionfd, clientIPAddress));
}
to this:
void HTTPProxyScheduler::scheduleRequest(int connectionfd,
                                          const string& clientIPAddress) {
  thread t([this](const pair<int, string>& connection) {
    handler.serviceRequest(connection);
  }, make_pair(connectionfd, clientIPAddress));
  t.detach();
}
While the above approach succeeds in getting the request off of the main thread, it doesn’t limit the number of threads that can be running at any one time. If your proxy were to receive hundreds of requests in the course of a few seconds – in practice, a very real possibility – the above would create hundreds of threads in the course of those few seconds, and that would be bad. Should the proxy endure an extended burst of incoming traffic – scores of requests per second, sustained over several minutes or even hours, the above would create so many threads that the thread count would immediately exceed a thread-manager-defined maximum.
Fortunately, you built a ThreadPool class for Assignment 4, which is exactly
what you want here. I’ve included the thread-pool.h file in the assign5
repositories, and I’ve updated the Makefile to link against my working
solution of the ThreadPool class. (If your Assignment 4 ThreadPool had
problems, that shouldn’t hurt you here.) You should leverage a single
ThreadPool with 64 worker threads, and use that to elevate your sequential
proxy to a multithreaded one. Given a properly working ThreadPool, going
from sequential to concurrent is actually not very much work at all.
Your HTTPProxyScheduler class should encapsulate just a single
HTTPRequestHandler, which itself already encapsulates exactly one
HTTPBlacklist and one HTTPCache. You should stick with just one scheduler,
request handler, blacklist, and cache, but because you’re now using a
ThreadPool and introducing parallelism, you’ll need to implant more
synchronization directives to avoid any and all data races. Truth be told, you
shouldn’t need to protect the blacklist operations, since the blacklist, once
constructed, never changes. But you need to ensure concurrent changes to the
cache don’t actually introduce any races that might threaten the integrity of
the cached HTTP responses. In particular, if your proxy gets two competing
requests for the same exact resource and you don’t protect against race
conditions, you may see problems.
Here are some basic requirements:
- You must, of course, ensure there are no race conditions – specifically, that no two threads are trying to search for, access, create, or otherwise manipulate the same cache entry at any one moment.
- You can have at most one open connection for any given request. If two threads are trying to fetch the same document (e.g. the HTTP requests are precisely the same), then one thread must go through the entire examine-cache/fetch-if-not-present/add-cache-entry transaction before the second thread can even look at the cache to see if it’s there.
You should not lock down the entire cache with a single mutex for all
requests, as that introduces a huge bottleneck into the mix, allows at most one
open network connection at a time, and renders your multithreaded application
to be essentially sequential. You could take the
map<string,unique_ptr<mutex>> approach that the implementation of oslock
and osunlock takes, but that solution doesn’t scale for real proxies, which
run uninterrupted for months at a time and cache millions of documents.
Instead, your HTTPCache implementation should maintain an array of 997
mutexes, and before you do anything on behalf of a particular request, you
should hash it and acquire the mutex at the index equal to the hash code
modulo 997. You should be able to inspect the initial implementation of the
HTTPCache and figure out how to surface a hash code and use that to decide
which mutex guards any particular request. A specific HTTPRequest will
always map to the same mutex, which guarantees safety; different
HTTPRequests may very, very occasionally map to the same mutex, but we’re
willing to live with that, since it happens so infrequently.
I’ve ensured that the starting code base relies on thread safe versions of
functions (gethostbyname_r instead of gethostbyname, readdir_r instead of
readdir), so you don’t have to worry about any of that. (Note your assign5
repo includes client-socket.[h/cc], updated to use gethostbyname_r.)
Additional Tidbits
- You should absolutely add logging code and publish it to standard out. We won’t be autograding the logging portion of this assignment, but you should still add tons so that you can confirm your proxy application is actually moving and getting stuff done.
- You can assume your browser and all web sites are solid and respect HTTP
request and response protocols. While testing, you should hit as many sites
as possible, sticking to major (HTTP, not HTTPS) web products like
www.latimes.com,www.washington.edu,www.ucsd.edu, and so forth. You should avoid sites that require a login or some other form of authentication, since they’ll likely mingle HTTP and HTTPS requests. - Your
proxyapplication maintains its cache in a subdirectory of your home directory called.proxy-cache-myth<num>.stanford.edu. The accumulation of all cache entries might very well amount to megabytes of data over the course of the next eight days, so you should delete that.proxy-cache-myth<num>.stanford.eduby invoking your proxy with the--clear-cacheflag. - If you want to impose a maximum time-to-live value on all cacheable
responses, you can invoke your proxy with
--max-age <max-ttl>. If you go with a 0, then the cache is turned off completely. If you go with a number like 10, then that would mean that cacheable items can only live in the cache for 10 seconds before they’re considered invalid. - Note that responses to
HEADrequests – as opposed to responses toGETandPOSTrequests – never include a payload, even if the response header includes a content length. Make sure you circumvent the call toingestPayloadforHEADrequests, else your proxy will get held up once the firstHEADrequest is intercepted. - Your
proxyapplication should, in theory, run until you explicitly quit by pressing ctrl-C. A real proxy would be polite enough to wait until all outstanding proxy requests have been handled, and it would also engage in a bidirectional rendezvous with the scheduler, allowing it the opportunity to bring down theThreadPoola little more gracefully. You don’t need to worry about this at all – just kill the proxy application without regard for any cleanup.
I hope you enjoy the assignment as much as I’ve enjoyed developing it. It’s genuinely thrilling to know that all of you can implement something as sophisticated as an industrial-strength proxy, particularly in light of the fact that many of you took CS106B and CS106X less than a year ago.