Tips for Working With Stanford's Myth Machines
Stanford provides a cluster of computers for use in CS classes known as myth that is equipped with gcc, gdb, Valgrind, etc. I’m using these computers as part of CS 107 this quarter. (If you aren’t a Stanford student taking CS 107, this post might be totally irrelevant to you, but maybe you can still get something out of it.) These machines can be a bit of a pain to use for someone who has never worked over SSH before, but there are a few things you can do to make life happier.
EDIT 6/8/20: This blog post is a bit out of date. I have written up some more recent tips here.
Avoid SSH timeouts
If you let an SSH session sit too long without activity (sometimes even as short as a few minutes), you’ll often get connection issues:
Write Failed: broken pipe
This is easy to solve by adding the following to ~/.ssh/config (you may need
to create this file if it does not exist):
Host *
    ServerAliveInterval 60
This sends a “null packet” every 60 seconds telling the server “hi, I’m still here!” and reduces the likelihood of a session timeout.
Note: This tip works on Mac and Linux; on Windows, open PuTTY, go to Connection (in the left pane), and set “Seconds between keepalives” to 60.
Set up Kerberos/SSO (for mac users)
EDIT 6/8/20: This tip no longer works on more recent versions of Mac OS. I recommend setting up persistent connections instead.
Wouldn’t you rather type ssh myth and be ready to roll, instead of typing
ssh [email protected], followed by your password, every time you want to
connect? (I’m lazy, I know. ¯_(ツ)_/¯) Kerberos is a system that Stanford uses
to manage authentication to its computers. If you set up Kerberos on OS X, you
can type your credentials once and get an authenticated “ticket”; then, all SSH
connections will automatically use that ticket instead of prompting you to
enter your password every time. (Note for people familiar with SSH keys: Yes,
SSH keys would allow us to easily log in too, but Stanford doesn’t support
public-key
authentication.
ಠ~ಠ)
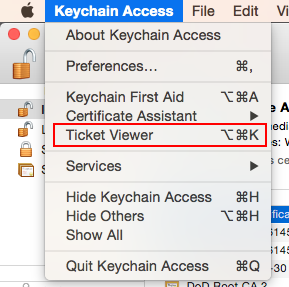
To set this up, open Keychain Access via Spotlight or Go > Utilities in Finder. Open the Ticket Viewer:
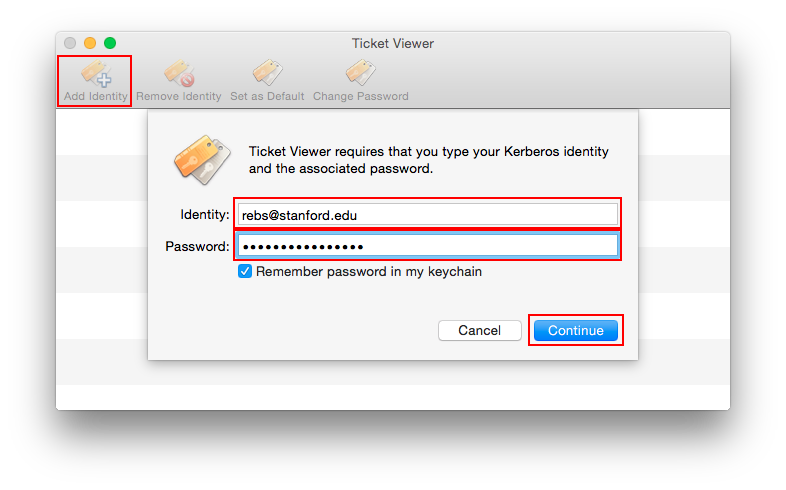
Click “Add Identity,” and enter your Stanford credentials:
Ticket Viewer should then show an authenticated ticket, expiring in 10 hours:
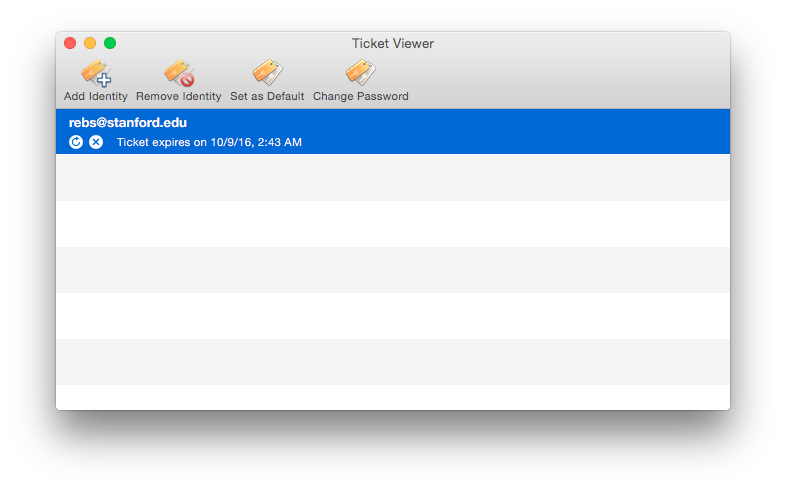
If you checked “Remember password in my keychain” while entering your credentials, OS X should automatically renew this ticket, and you shouldn’t need to enter your password again. If you ever change your password, you can come back here, click Remove Identity, and add it again.
Now that you have an authenticated Kerberos ticket, you need to configure SSH
to send that ticket to the myth machines, proving that you have authenticated.
Edit (or create) ~/.ssh/config, adding the following:
Host myth myth.stanford.edu
    HostName myth.stanford.edu
    User rebs
    GSSAPIKeyExchange yes
    GSSAPIAuthentication yes
    GSSAPIDelegateCredentials yes
This does a few things:
- The first line declares that this configuration should apply when we
ssh mythorssh myth.stanford.edu. - The second line says that the server we want to connect to is at
myth.stanford.edu. (This matters, because if wessh myth, ssh doesn’t have a domain name to connect to and won’t know what to do.) - The third line specifies your username. If your SUID is the same as your
computer’s username, you don’t need this. However, if they differ and you
don’t want to have to specify your SUID as
ssh suid@mythevery time, you can specify your username here. - The last three lines configure SSH to forward Kerberos tickets as a means of authentication.
Now, you can ssh myth, and you should land at a shell prompt without needing
to type anything extra. Yay lazy people ꒰・◡・꒱
Note: these instructions are for Mac, but I’m sure there’s also a way to do this in Windows or Linux.
Add the CS 107 tools directory to your $PATH
PATH is an environment variable that contains a list of folders separated by colons, perhaps like this:
$ echo $PATH
/usr/local/bin:/usr/local/sbin:/usr/bin:/bin:/usr/sbin:/sbin
Whenever you run a command, your shell checks that list of folders for a binary
with that name. If you run cp with the above PATH, the shell will first
check /usr/local/bin for a binary named cp – not there – then
/usr/local/sbin – also not there – then /usr/bin – not there either :-/
– and then /bin – ah, found it!
CS 107 has a /afs/ir/class/cs107/tools directory with a few important
executables. Instead of trying to remember that whole path and running
/afs/ir/class/cs107/tools/sanitycheck custom_tests every time you want to
test your program, you can add /afs/ir/class/cs107/tools to your PATH;
then, you can just run sanitycheck custom_tests or submit and things will
Just Work™.
To do this, log into myth and edit (or create) ~/.bashrc (or the
configuration file for your shell of choice – but then you probably already
know how to do this ʘ‿ʘ) and add the following at the end:
export PATH=$PATH:/afs/ir/class/cs107/tools/
Now try running sanitycheck or submit in an assignment directory, as you
might run cd or ls. Voila!
Symlink the cs107 directory
Not only can I not remember where submit and sanitycheck are (re: above
tip), I also have the hardest time remembering the path to the class samples
and repos. Fortunately, it’s easy to create a symlink (symbolic link, like a
shortcut or alias) from your home directory to the cs107 directory. Simply run
ln -s /afs/ir/class/cs107/ ~/class (or replace ~/class with a path that you
like better):
$ ln -s /afs/ir/class/cs107/ ~/class
$ ls class
ARCHIVE.README  cgi-bin  private_data  repos  samples  staff  tools  WWW
$ ls class/samples/lect4/
addr    addr.o        array_sizeof.c  Makefile  sizes.c  strsort    strsort.o      uninitialized.c
addr.c  array_sizeof  array_sizeof.o  sizes     sizes.o  strsort.c  uninitialized  uninitialized.o
Now, the cs107 folder is easily accessible from your home directory. (Note
that this is very different from copying the folder to your home directory; a
symbolic link is just an alias, so as the professor modifies the code in
/afs/ir/class/cs107/samples/ during lecture, those changes will be reflected
in ~/class/samples.)
Learn your editor
Really. CS 107 has guides for
vim and
emacs. If you use vim,
take some time to work through vimtutor (just run the command). There are
lots of vim tutorials
online, and
vimcasts is a cool resource.
EDIT 6/8/20: I have gotten much better at using Vim since I wrote this :) I have a better list of vim tips here.
There are lots of good resources that I won’t attempt to match, but here are some random vim tips:
- Press
uto undo andctrl+rto redo y<motion>will copy/yank,d<motion>will cut, andpwill paste. For example, pressddto cut a line andpto paste it, orywto copy a word. If you’re uncomfortable with motions, pressvto enter visual mode, then move your cursor until you select what you want to copy or cut, then pressdory, and then paste where desired.-
You can configure vim to automatically indent things (add to
~/.vimrc):set tabstop=4 " Tab characters will take up 4 characters' width on the screen set expandtab " Use spaces instead of actual tab characters to indent set shiftwidth=4 " If you press tab, 4 spaces will be inserted set smarttab " Automatically indents things (e.g. indents a level when you open a code block) -
Enable relative line numbers! If I wanted to delete from the current line (line 6) to the line reading
set incsearch, I have a few options. I could spamdduntil all the desired lines are gone, but that’s kind of slow… I could count how many lines downset incsearchis, but that’s also very slow if you want to delete many lines up/down. Or, I could look at the relative line numbering to the left, see that the desired line is 5 lines down, and then hitd5j.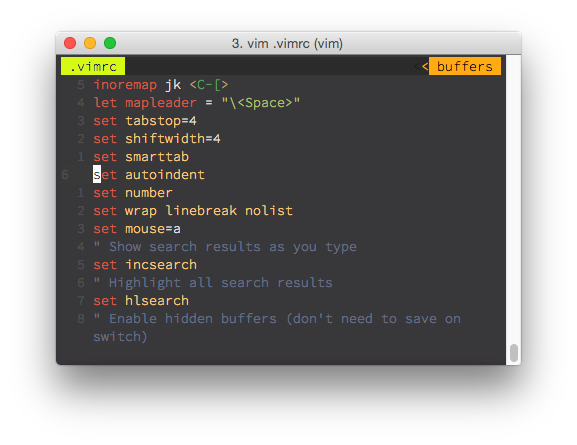
To enable this, add the following to your
~/.vimrc:set number set relativenumber - (On a mac, but maybe also on other systems) Enable mouse interaction! If you
add
set mouse=ato your vimrc, you can click around in the editor, scroll, drag to highlight, etc… In general, it is better/faster to use a keyboard to navigate and do things, but sometimes being able to use a mouse is nice. - You can search in vim by typing
/followed by a search term. To have search results highlighted as you type, addset incsearchto your vimrc. - By default, backspace won’t work over line breaks (i.e. if you hold backspace
to delete at a line, the cursor will stop at the beginning of the line
instead of continuing to delete the preceding line, contrary to how most apps
works). To make backspace work like most apps do, add
set backspace=2to your vimrc.
Optional: Set a custom shell
The default shell on myth is bash. It seems you can change your shell across
all Stanford machines by emailing Research
Computing,
but short of doing that, you can add exec zsh (or whatever shell) to
~/.bash_profile. (Don’t add it to .bashrc, or else running bash from zsh
will give you another zsh shell, and running bash somescript.sh will execute
the script with zsh instead of bash.)
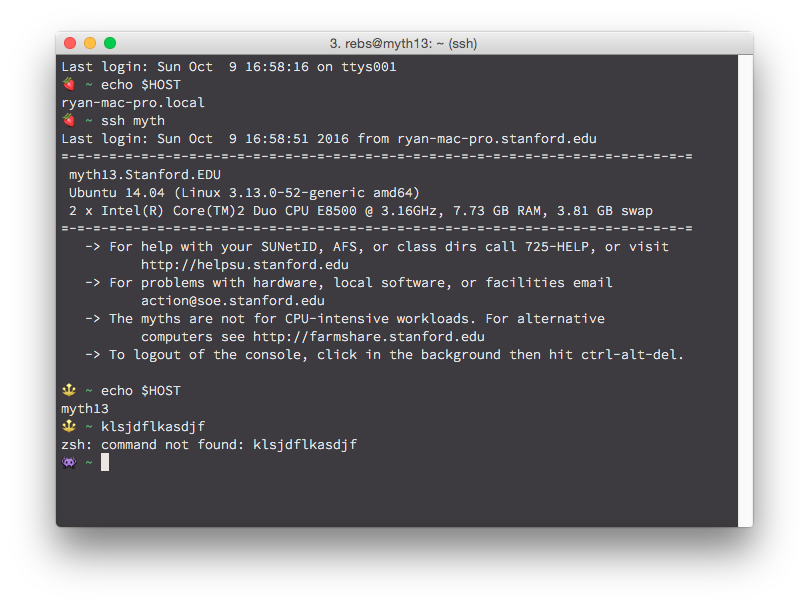
Depending on your situation, it might be nice to change your shell prompt so that you know you’re running on a different host. My zsh prompt is a strawberry on my local machine, but a trident on myth, and a space invader when the return code is non-zero :3
If you use iTerm, you can even set up profile switching so that e.g. your background changes colors when you ssh into myth.
Conclusion
Hopefully these tips help make myth a little nicer to work in. If you have any tips or suggestions of your own, leave them in the comments below!
I'm Ryan, and I would love to hear from you. Send me an email or leave a comment below!

Interested in reading more articles like this one? Join my mailing list and I'll email you when I publish a new post! I typically post less than once a month.