Getting Started With Web Development
I recently taught an introductory frontend web development workshop for the Harper Society of Engineers, and I promised I would post a writeup of what I taught. This is that writeup!
Introduction
This workshop is meant to be a complete beginner’s introduction to getting started with web development. Web development is very powerful, and has applications beyond just making traditional websites; for example, you could build a user interface for a plant irrigation system as a web page, and then you would be able to monitor and water your plants from any computer or phone. Web development is a very broad topic that has expanded so rapidly in the last decade that you could spend your entire life working with it and still not know everything there is to know. Since this workshop is only an hour long, we will only be scratching the surface… Know that there is much more to learn and much more you can do with this!
This workshop is not meant to magically make you a great web developer, nor is it meant to teach you everything you need to know. There are countless other tutorials on the Internet for that. Rather, this workshop/tutorial is intended to help you get a footing in the world of web development and to establish a bit of a foundation from which you can learn more.
The web “stack”
Modern technology is incredibly complex and has far more moving parts than we humans can think about at one time. For an illustration of just how complex things are, see Alex Gaynor’s “What Happens When” (note that even this page glosses over many details!). In order to deal with all of this, we separate complexity into “layers of abstraction.” In order to display a single letter on the screen, we need to calculate which pixels the letter occupies given a certain font, and we need to redraw the screen so that those pixels are shaded in, but that is terribly complicated. Instead, we might write a function that, given any letter of text, draws it on the screen. That is one layer of abstraction. Then, we might write another function that, given any string of text (e.g. “Hello world”), calls our first function to draw every letter. That is another layer of abstraction. Then, we might make a program that does something useful, and that program can call those functions without needing to worry about how text is drawn on the screen. Layers of abstraction let us focus on what’s important, delegating fine-grain implementation details to some other layer. Layers let us think about one thing at a time.
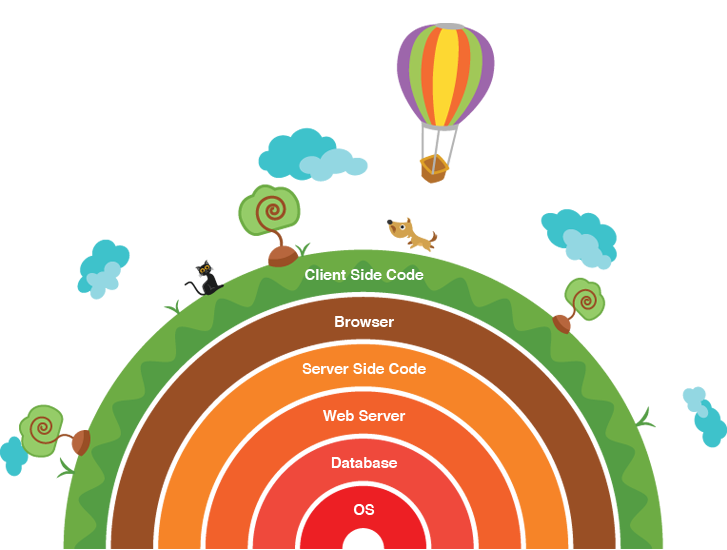
Defined loosely, then, a technology “stack” is a collection of the abstraction layers involved. Layers higher on the stack, called “high-level” technologies, depend on the layers lower in the stack (“low-level” technologies) to get things done. The lower-level technologies take care of implementation details. In a web application, the “frontend” – the part of the application with which a human interacts – is at the top of the stack. The frontend builds on top of and communicates with the “backend,” which in turn builds on various other technologies. SitePoint has a nice illustration of a web stack:
In this workshop, we will only be focusing on the frontend; that is, we will only be building web pages that people interact with. Software engineers who focus on frontend development are largely concerned with building pages that are visually appealing and easy for humans to interact with. Be aware that there are many other components to web development that you may or may not be interested in.
The frontend technology trio
Three languages are used when developing web pages: HTML (Hyper Text Markup Language), CSS (Cascading Style Sheets), and JavaScript. Each has a specific purpose:
- HTML is used for defining the content and structure of the page. For example, the HTML for this page defines this text that you are reading, and it tells your browser that this text is in a bullet point, and it tells your browser that this text comes after “The frontend technology trio” header.
- CSS is used to style a page. CSS says things like “all links should be blue,” or “this image should be 50px wide,” or “the text on a page should be dark gray by default, but this text here should be red.”
- JavaScript is used to add functionality to a page. When you click “Add Friend” on Facebook, JavaScript is used to actually add the friend. Unlike HTML and CSS, JavaScript is a complete programming language (HTML is a “markup language,” and CSS is more of a syntax for describing styles).
Typically, to avoid unnecessary complexity, we try to ensure that each language is only used for its intended purpose (e.g. we try to avoid setting colors in HTML, even though you can do that).
In this workshop, we will only be talking about HTML and CSS. There are many good tutorials covering JavaScript online, should you want to learn more, and perhaps we’ll host a JavaScript workshop in the future.
Browsers
In working on web development, you will often come across references to the “browser.” A browser is a computer program that reads HTML, CSS, and JavaScript code, and converts it into the visual web pages that you, as a human, see. You are using a browser to read this web page right now. As it happens, different browsers sometimes interpret the same HTML/CSS/JavaScript code differently, doing different things for the same code and creating what are known as “compatibility issues.” We won’t be talking about compatibility in this tutorial, since most up-to-date browsers are on the same page, but be aware that they exist.
A note on syntax
I think one of the greatest obstacles for beginner programmers is syntax. Many see the hodgepodge of symbols on the screen and freak out. How am I supposed to remember all of that? The answer is, you don’t have to. If you forget the syntax, you can Google it, or just refer to your notes, or previous work. Syntax is intimidating at first, but if you practice enough, it will all make sense eventually – I promise! Just keep at it, and don’t worry about memorizing.
Getting Started
Many web development tutorials begin with getting a development environment set up. In the interest of time, we are going to skip that, and we are going to use an online development environment called CodePen. This lets you type HTML, CSS, and JS directly into the browser, and lets you preview your work in realtime. It is a great tool for getting started quickly! (Similar tools include JSFiddle and JS Bin.)
Start by going to http://codepen.io/pen/ to start a new project. You don’t need a CodePen account, but if you plan on using it a lot, it might be a good idea to create one so that you can keep all your projects in one place.
This will open a development environment that looks like this:
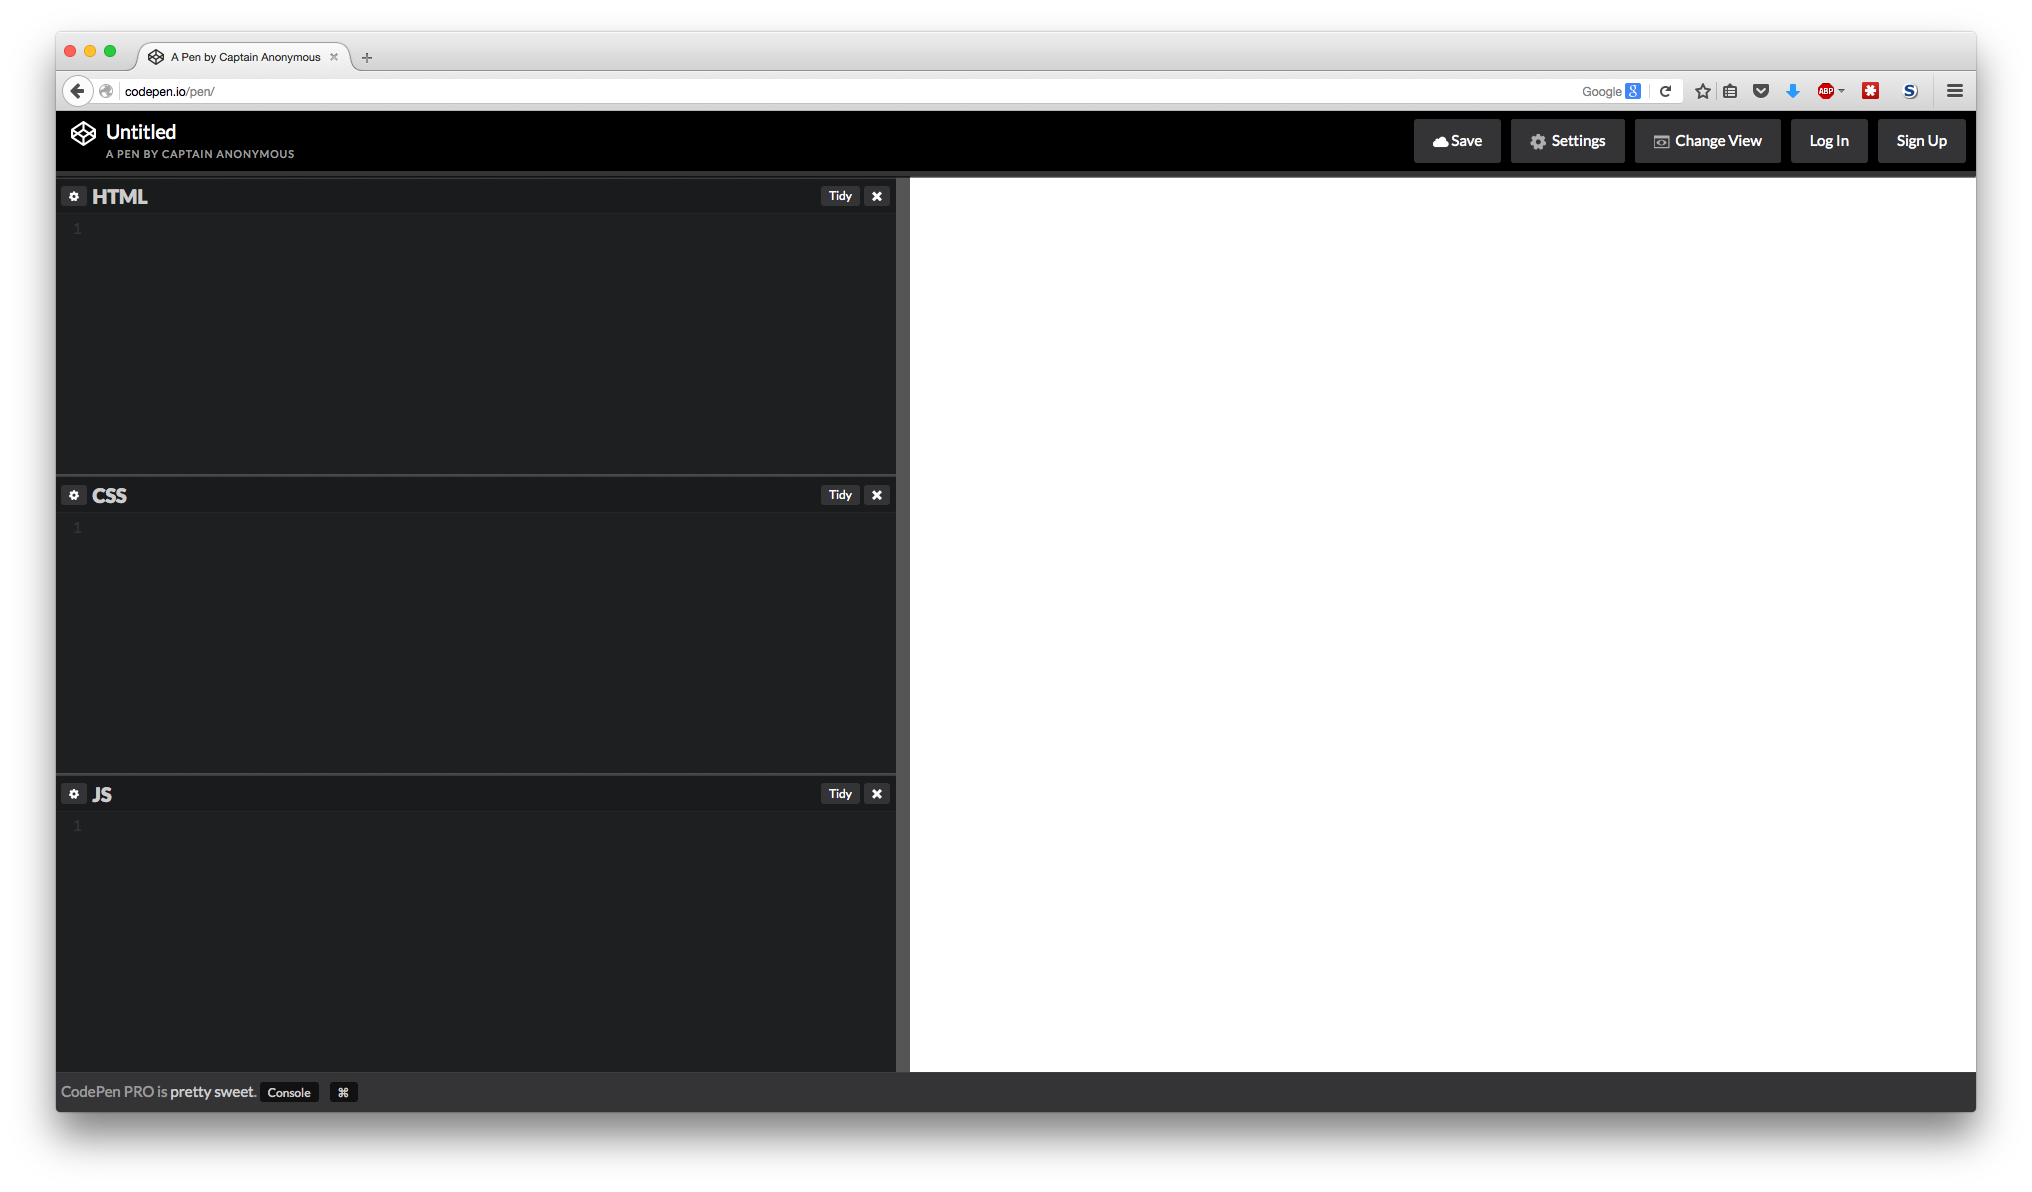
You can click the “x” button on the JS pane to hide it, since we won’t be using JavaScript in this workshop.
You can type any HTML into the “HTML” pane, and any CSS into the “CSS” pane, and the big white pane (which contains a preview of your work) should automatically update.
HTML
Again, HTML is used to define the structure and content of a page.
Tags
A web page is constructed in HTML using a variety of different tags. There are
many tags for doing many different things. The first thing we need to talk about
is the html tag:
<html lang="en">
</html>
This announces that we are creating an HTML page. The <html lang="en"> is called an
“opening tag,” and the </html> is called a “closing tag”; anything between
these two tags will be inside our HTML page.
Tags can also have attributes, which can denote information about the tags or change the tags’ functionality. In this case, we can declare that our page is written in English:
<html lang="en">
</html>
There are two tags that are most always present inside the html tag: the
head tag, and the body tag:
<html lang="en">
    <head>
    </head>
    <body>
    </body>
</html>
The head
The head tag contains metadata and information about the page (including
styles that are associated with the page), while the body contains the page
content. We could define a title for our page using the title tag:
<html lang="en">
<head>
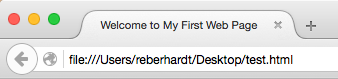
<title>Welcome to My First Web Page</title>
</head>
<body>
</body>
</html>If you were to open this page directly in your browser (which you won’t if you’re using Codepen), “Welcome to My First Web Page” would appear in the tab bar or at the top of the window:
This also defines what shows up as the page title when Google shows your page in search results.
We are also going to add some styles to our page.
Twitter Bootstrap is a CSS framework that provides
some default styles that look nice. It is very handy for getting a
decent-looking website running in very little time. There is documentation on
all of the things Bootstrap provides
here. To use Bootstrap with our page, we
add a link tag to the head section:
<html lang="en">
    <head>
        <title>Welcome to My First Web Page</title>
        <link rel="stylesheet" href="https://maxcdn.bootstrapcdn.com/bootstrap/3.3.6/css/bootstrap.min.css" />
    </head>
    <body>
    </body>
</html>
This tells the browser that there is another file associated with this web page,
that this other file defines styles (rel="stylesheet"), and that this other
file can be found at the link provided (href="..."). (If you’re curious,
“href” stands for “hypertext
reference.”)
You may have noticed that there is no </link> closing tag in the above HTML.
Some tags (area, base, br, col, command, embed, hr, img,
input, keygen, link, meta, param, source, track, wbr) are known
as “self-closing tags” or “void elements.” These tags do not need a matching
</whatever> closing tag.
Adding content
At this point, Codepen’s preview pane should still be white. There is still nothing on our page. Let’s add some content!
Headings
Heading tags (which are not the same as head tags, discussed above) allow
you to create section headings using big, bold text. There are six levels of
section headings for which Bootstrap defines styles. You can add these headings using the h1, h2, h3, h4, h5, and h6 tags.
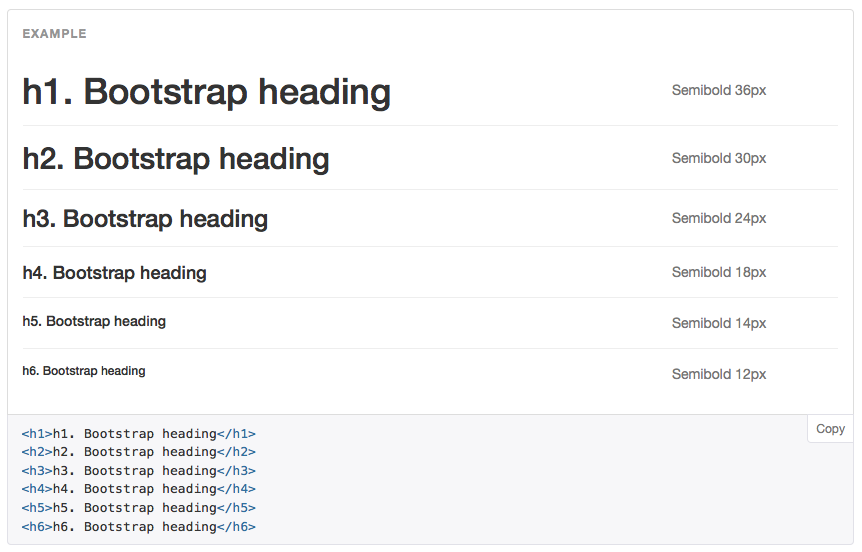
Let’s add some headings to our page:
<html lang="en">
    <head>
        <title>Welcome to My First Web Page</title>
        <link rel="stylesheet" href="https://maxcdn.bootstrapcdn.com/bootstrap/3.3.6/css/bootstrap.min.css" />
    </head>
    <body>
        <h1>Welcome to my web page!</h1>
        <h2>About Me</h2>
        <h2>My favorite websites</h2>
    </body>
</html>
Text
We can add regular text to our page as well using the p (paragraph) tag:
<html lang="en">
    <head>
        <title>Welcome to My First Web Page</title>
        <link rel="stylesheet" href="https://maxcdn.bootstrapcdn.com/bootstrap/3.3.6/css/bootstrap.min.css" />
    </head>
    <body>
        <h1>Welcome to my web page!</h1>
        <p>My name is Ryan, and this is my website.</p>
        <h2>About Me</h2>
        <p>I am a sophomore at Harper College studying Computer Science.</p>
        <h2>My favorite websites</h2>
    </body>
</html>
You could also type text in without a p tag:
<h1>Welcome to my web page!</h1>
My name is Ryan, and this is my website.
However, this is considered bad form, and it makes the text more difficult to style (as we’ll talk about later).
Links
We can add links to other pages using the a (anchor) tag:
<html lang="en">
    <head>
        <title>Welcome to My First Web Page</title>
        <link rel="stylesheet" href="https://maxcdn.bootstrapcdn.com/bootstrap/3.3.6/css/bootstrap.min.css" />
    </head>
    <body>
        <h1>Welcome to my web page!</h1>
        <p>My name is Ryan, and this is my website.</p>
        <h2>About Me</h2>
        <p>I am a sophomore at Harper College studying Computer Science.</p>
        <h2>My favorite websites</h2>
        <p><a href="https://facebook.com">Facebook</a></p>
        <p><a href="https://my.harpercollege.edu">Harper College</a></p>
    </body>
</html>
Line breaks
In the above example, we put each “favorite website” link in a separate
paragraph so that each would appear on a separate line. HTML is a little bit
weird in that if you don’t explicitly say “a new line should start here,” it
won’t create any new lines, so if you removed the p tags, both links would be
on the same line (even though they are on different lines in your HTML code).
Try it in CodePen! We can explicitly declare line breaks using the br tag:
<html lang="en">
    <head>
        <title>Welcome to My First Web Page</title>
        <link rel="stylesheet" href="https://maxcdn.bootstrapcdn.com/bootstrap/3.3.6/css/bootstrap.min.css" />
    </head>
    <body>
        <h1>Welcome to my web page!</h1>
        <p>My name is Ryan, and this is my website.</p>
        <h2>About Me</h2>
        <p>I am a sophomore at Harper College studying Computer Science.</p>
        <h2>My favorite websites</h2>
        <p>
            <a href="https://facebook.com">Facebook</a>
            <br />
            <a href="https://my.harpercollege.edu">Harper College</a>
        </p>
    </body>
</html>
Lists
Instead of just having our “favorite links” on separate lines, we could have
them in a bullet-point list. The ul (unordered list) tag defines a
bullet-point list, and the li tag defines an item in the list. (You can also
use the ol tag instead of ul to create a numbered/ordered list.)
<html lang="en">
    <head>
        <title>Welcome to My First Web Page</title>
        <link rel="stylesheet" href="https://maxcdn.bootstrapcdn.com/bootstrap/3.3.6/css/bootstrap.min.css" />
    </head>
    <body>
        <h1>Welcome to my web page!</h1>
        <p>My name is Ryan, and this is my website.</p>
        <h2>About Me</h2>
        <p>I am a sophomore at Harper College studying Computer Science.</p>
        <h2>My favorite websites</h2>
        <ul>
            <li><a href="https://facebook.com">Facebook</a></li>
            <li><a href="https://my.harpercollege.edu">Harper College</a></li>
        </ul>
    </body>
</html>
Images
We can insert images using the img tag:
<html lang="en">
    <head>
        <title>Welcome to My First Web Page</title>
        <link rel="stylesheet" href="https://maxcdn.bootstrapcdn.com/bootstrap/3.3.6/css/bootstrap.min.css" />
    </head>
    <body>
        <h1>Welcome to my web page!</h1>
        <img src="https://lh3.googleusercontent.com/-3L4O19eKaic/AAAAAAAAAAI/AAAAAAAAR6s/8Fxleq7e0gI/s120-c/photo.jpg" />
        <p>My name is Ryan, and this is my website.</p>
        <h2>About Me</h2>
        <p>I am a sophomore at Harper College studying Computer Science.</p>
        <h2>My favorite websites</h2>
        <ul>
            <li><a href="https://facebook.com">Facebook</a></li>
            <li><a href="https://my.harpercollege.edu">Harper College</a></li>
        </ul>
    </body>
</html>
Divs
Behold, the magical div! Alone, a div does practically nothing. It is simply
a tag that contains other tags – a container for HTML. If we put parts of our
page into divs, it will not look any different:
<html lang="en">
    <head>
        <title>Welcome to My First Web Page</title>
        <link rel="stylesheet" href="https://maxcdn.bootstrapcdn.com/bootstrap/3.3.6/css/bootstrap.min.css" />
    </head>
    <body>
        <h1>Welcome to my web page!</h1>
        <img src="https://lh3.googleusercontent.com/-3L4O19eKaic/AAAAAAAAAAI/AAAAAAAAR6s/8Fxleq7e0gI/s120-c/photo.jpg" />
        <p>My name is Ryan, and this is my website.</p>
        <div>
            <h2>About Me</h2>
            <p>I am a sophomore at Harper College studying Computer Science.</p>
        </div>
        <div>
            <h2>My favorite websites</h2>
            <ul>
                <li><a href="https://facebook.com">Facebook</a></li>
                <li><a href="https://my.harpercollege.edu">Harper College</a></li>
            </ul>
        </div>
    </body>
</html>
However, divs are powerful because they can be used to organize content on a
page. When we get to the CSS part of this workshop, we will use the above HTML
to create a two-column layout. Open up nearly any modern web page, and you will
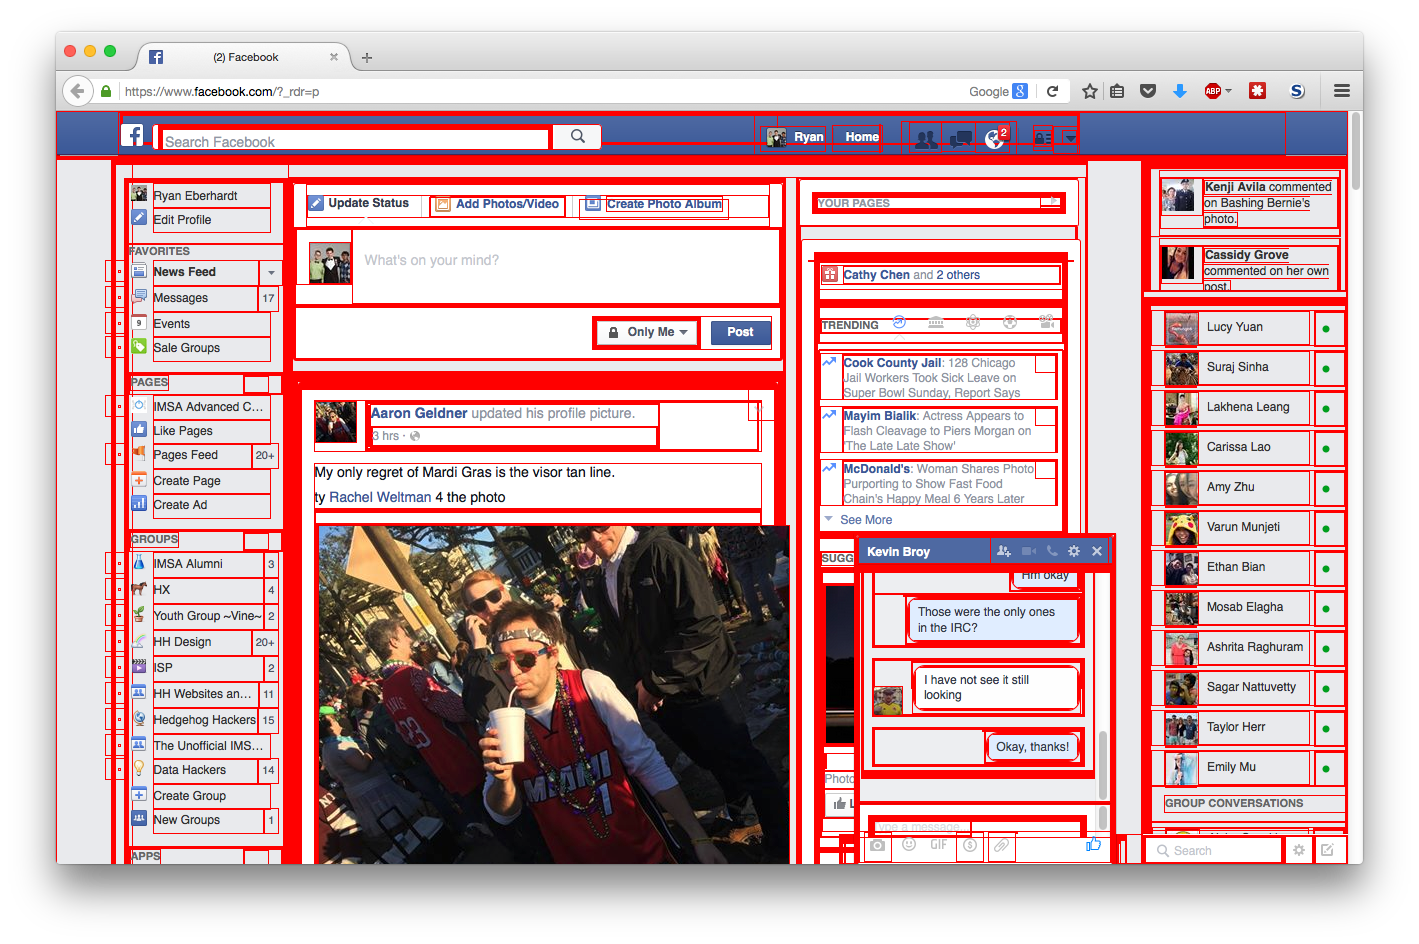
find divs used as a powerful layout tool. In this screenshot of Facebook,
every div is outlined in red:
Comments
You can add comments to your code using the <!-- --> syntax:
<h1>This is a header</h1>
<!-- This is a comment, which
     can span multiple lines and won't appear on the page -->
<p>This is a paragraph, which will appear on the page</p>
Comments can be used to annotate your HTML. Comments won’t appear on the page when it is displayed in a browser.
A note on tags
There are 130 defined HTML tags in the HTML5 specification! Some are essential, while others are rarely used. I have shown you the elements that I think you will find most useful getting started, but if you need to do something else (such as embed a YouTube video), just Google it and you will quickly find the answer! :)
CSS
CSS (Cascading Style Sheets) is used to style web pages – that is, to change fonts, change colors, change sizes, etc. CSS is extremely powerful, and can even be used to create animations on a web page. We are only going to cover the bare, bare basics.
Syntax
A CSS file contains a series of “rule sets.” These contain rules that tell a browser how certain elements on the page should look. The syntax of a rule set is as follows:
selector {
    property: value;
}
The selector specifies which elements on the page the rules should apply to.
CSS selectors are extremely powerful and I would highly suggest
reading more about them.
For example, you could use the selector ol li:nth-child(even) to select only
the even-numbered elements in a numbered list. In this tutorial, we will only be
using “element selectors,” which target all instances of an HTML tag, and “class
selectors,” which we will talk about in a moment. The h1 element selector
targets all h1 tags.
The property specifies the property of the selected elements that should be
modified (if that wasn’t obvious ^_^). Common properties include color,
background, border, font, height, width, margin, and padding.
A simple example
We could use CSS to make the text in all p tags small and green:
p {
    color: #3CE02D;
    font-size: 10px;
}
The value #3CE02D is known as a hex code. You can find the hex code for a
color by using an online color picker. See
here for more info about colors
in CSS.
This isn’t a great example, since using Bootstrap makes it so that our (currently very simple) page already looks decent. However, you can play around with this.
CSS classes
Quite often, we don’t want to target all elements of a given type. Maybe our web page has links that perform some destructive action (e.g. an “unfriend” link on Facebook), and we want these links to appear red. In these situations, we can use classes to target elements.
An element can have one or more classes defined in its class attribute:
<a href="..." class="class1 class2">Link text</a>In the “unfriend” example:
<a href="unfriend-user.html" class="danger">Unfriend This Person</a>Now, we can make all HTML elements that have the class danger red:
.danger {
    color: #FF0000;
}
Using divs
One thing I do want to show in CSS is how to make a two-column layout
using div elements. Using the HTML from the HTML section above, we
can style the divs as follows:
div {
    width: 50%;
    float: left;
}
This sets the width of each div to 50% of its container (in this case, the
container is the body tag, representing the entire page). The float property
is used to lay out the divs side-by-side, as opposed to on top of each other
(as they would appear without float – try it!). For more info about the
float property, see
this excellent tutorial.
This works, but we can do a bit more to make the page look nice. For one, our
text runs up against the left side of the screen, making it uncomfortable to
read on large screens. Let’s wrap all of our content in a .content div, and
add the pane class to our two existing divs. (We are going to limit the width
of the .content div, and we don’t want these rules to apply to the .pane divs,
so we need to have different classes.)
<html lang="en">
    <head>
        <title>Welcome to My First Web Page</title>
        <link rel="stylesheet" href="https://maxcdn.bootstrapcdn.com/bootstrap/3.3.6/css/bootstrap.min.css" />
    </head>
    <body>
        <div class="content">
            <h1>Welcome to my web page!</h1>
            <img src="https://lh3.googleusercontent.com/-3L4O19eKaic/AAAAAAAAAAI/AAAAAAAAR6s/8Fxleq7e0gI/s120-c/photo.jpg" />
            <p>My name is Ryan, and this is my website.</p>
            <div class="pane">
                <h2>About Me</h2>
                <p>I am a sophomore at Harper College studying Computer Science.</p>
            </div>
            <div class="pane">
                <h2>My favorite websites</h2>
                <ul>
                    <li><a href="https://facebook.com">Facebook</a></li>
                    <li><a href="https://my.harpercollege.edu">Harper College</a></li>
                </ul>
            </div>
        </div>
    </body>
</html>
Now, we can style the page as follows:
.content {
    max-width: 800px;
    margin-left: auto;
    margin-right: auto;
    padding-left: 10px;
	padding-right: 10px;
}

.pane {
    width: 50%;
    float: left;
	padding-right: 10px;
}
The max-width property makes it so that the text does not take up the whole
screen. This improves readability; text that stretches across the entire screen
is difficult to read on a large monitor. The margin-left and margin-right
properties set to auto horizontally centers the .content div; the div takes
a certain amount of space inside body, and the automatic margins fill in the
rest of the space equally, making .content horizontally centered. padding
is added to prevent the text from touching the edges of the window (another
readability thing). We also add padding to .pane to prevent the text in the
left pane from running into the text in the right pane.
More about CSS
We have only skimmed the surface of using CSS. If you want to study further, I would recommend learning about some of the core CSS concepts:
- Cascading styles (in a nutshell, you can have general styles, which are overridden by more specific styles)
- Box model
- Element layout
- Positioning and floats
- Selectors
- Units of length
- Border-box: Not a fundamental concept, but a good thing to know about
You can also get a lot of layout done with Bootstrap’s grid. Bootstrap includes styles for many different components, if you need something quick and don’t want to write the CSS yourself.
Once you feel like you have a feel for the CSS basics, try going through some CSS tutorials so you can see how people achieve different effects and different styles. There are good compilations here and here, and there are many more if you look around.
If you are interested in doing more advanced things with CSS:
One good exercise to improve your CSS chops is to try to style the same page in at least three very distinct ways. If you are really interested in going further, it would be good to also pick up a good CSS book.
Deploying your work
One of the best parts of web development is that nearly anyone can access your work. No need to worry about what OS someone is running, and no need to fiddle with installers… Anyone with a computer, a modern browser, and an Internet connection can see your work.
To get started, you’ll need a decent text editor. Atom is a nice, free, open-source editor; Sublime Text is very nice as well (you can download the free trial, which never expires). Fun fact: Atom is made with HTML/CSS/JavaScript!
Once you have the text editor installed, create a folder on your computer where
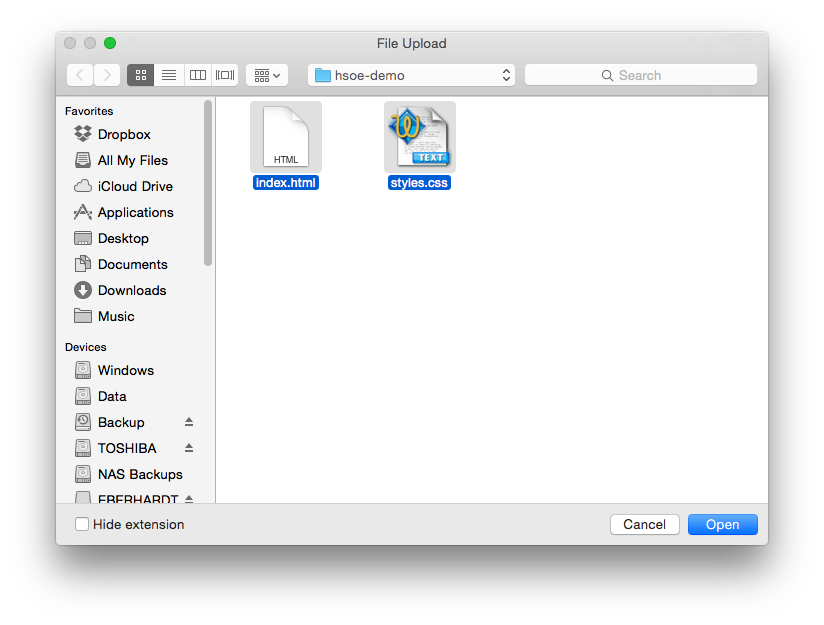
you will save your website. Open up the editor, paste your HTML into a new file,
and save this file as index.html in your folder. index.html is a specific
filename representing the home page of a website (this is actually a bit of a
simplification, but it works for now). If you want to create multiple web pages,
you can save them as other .html files. Next, paste your CSS into a new file,
and save that file as styles.css.
The next thing we need to do is tell browsers that styles.css contains styles
for index.html. Remember how earlier, we used a link tag to apply Bootstrap
styles to our page? We can do something similar:
<html lang="en">
    <head>
        <title>Welcome to My First Web Page</title>
        <link rel="stylesheet" href="https://maxcdn.bootstrapcdn.com/bootstrap/3.3.6/css/bootstrap.min.css" />
        <link rel="stylesheet" href="styles.css" />
    </head>
    <body>
        <!-- The rest of your page... -->
    </body>
</html>
Note that the styles.css link comes after the Bootstrap link tag; that
way, the styles defined in styles.css (i.e. our styles) will override the
Bootstrap styles.
At this point, you should be able to double click index.html in Windows
Explorer or Finder or whatever you use, and it should open up in your web
browser. All your content and styles should be there. (If not, you did something
wrong. Make sure that index.html and styles.css are in the same folder, and
make sure that you have the link tag for styles.css in the index.html
<head>, and make sure everything is spelled properly.)
If you want to add images to your site from your hard drive, you can do that as
well. Copy them to your website folder, and then add an img tag referencing
the file:
<img src="filename.jpg" />Once you have your website saved on your computer, you can upload it to a website host. There are many different companies that offer web hosting services. The easiest/fastest/cheapest solution I have found is actually to use Dropbox to host your website.
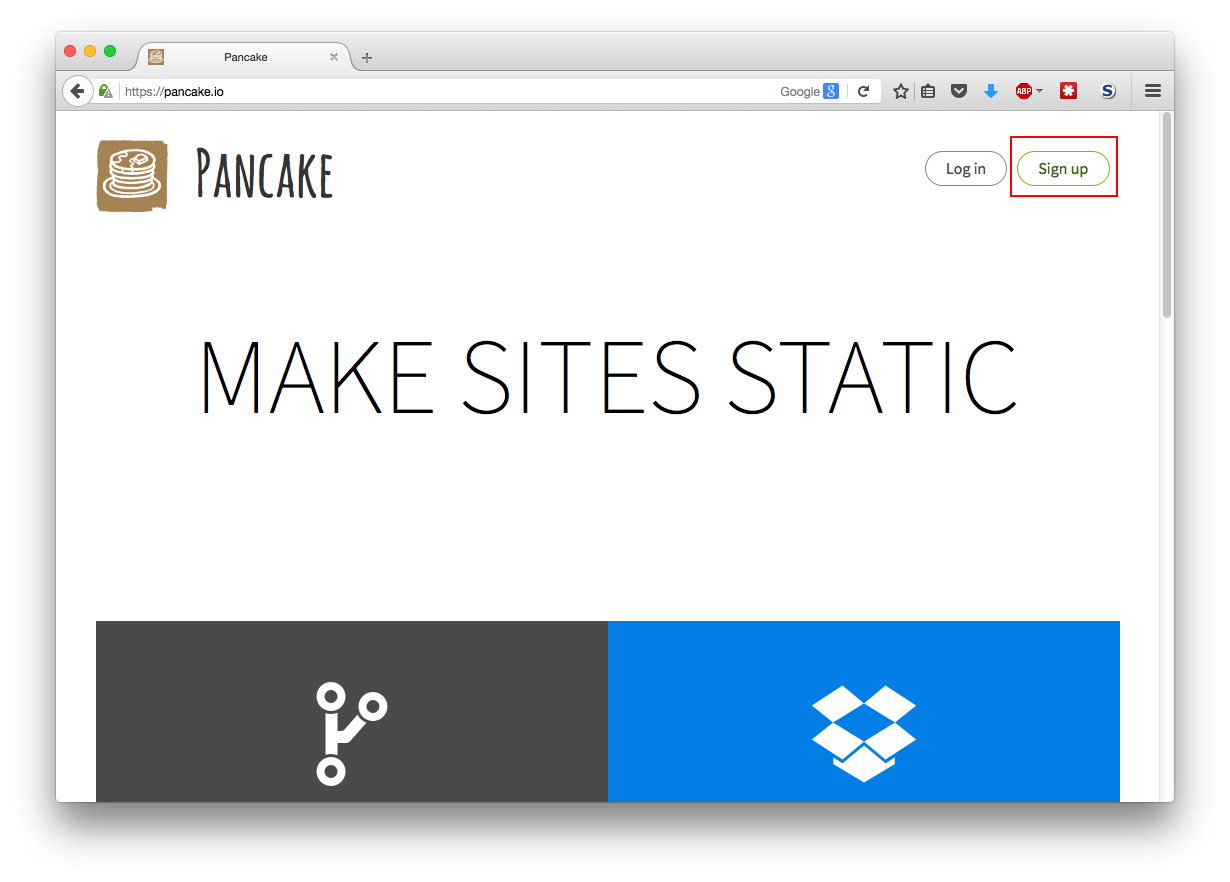
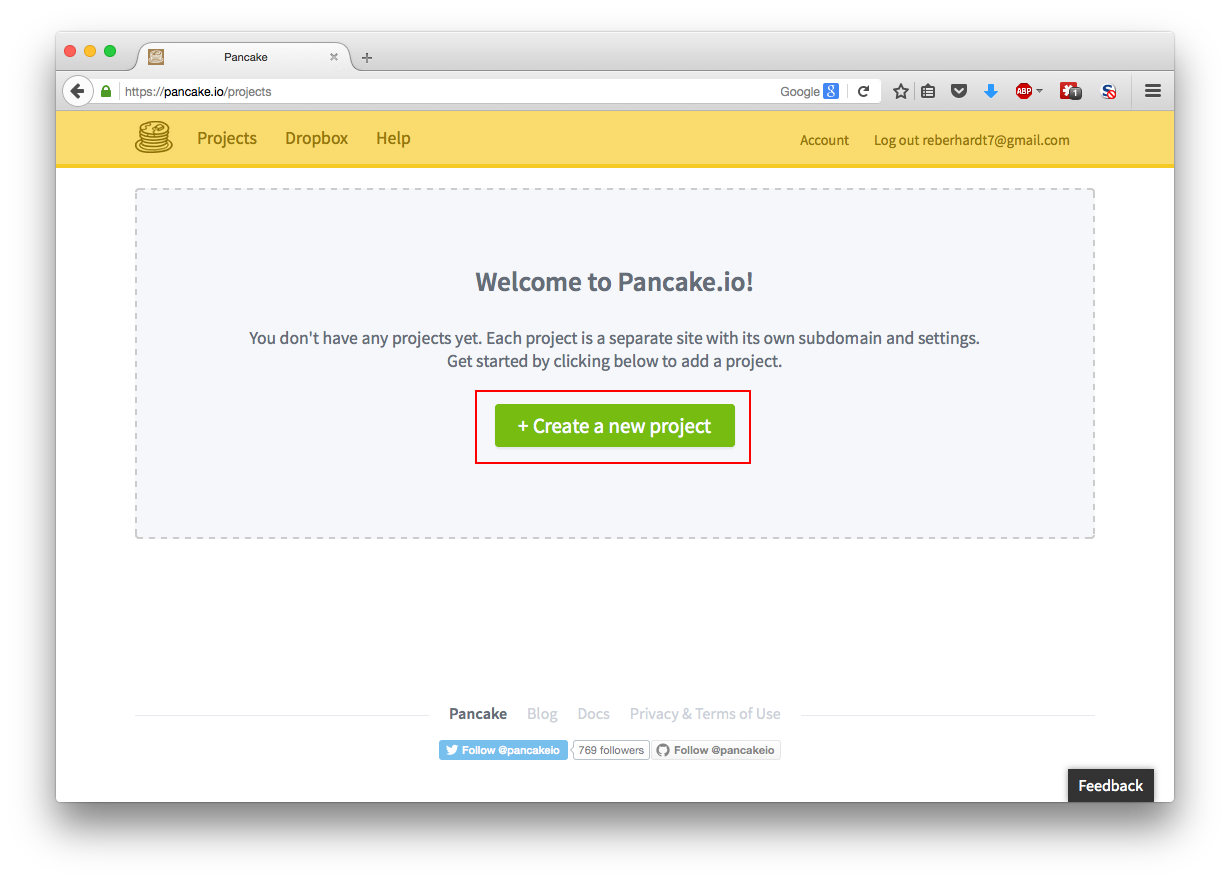
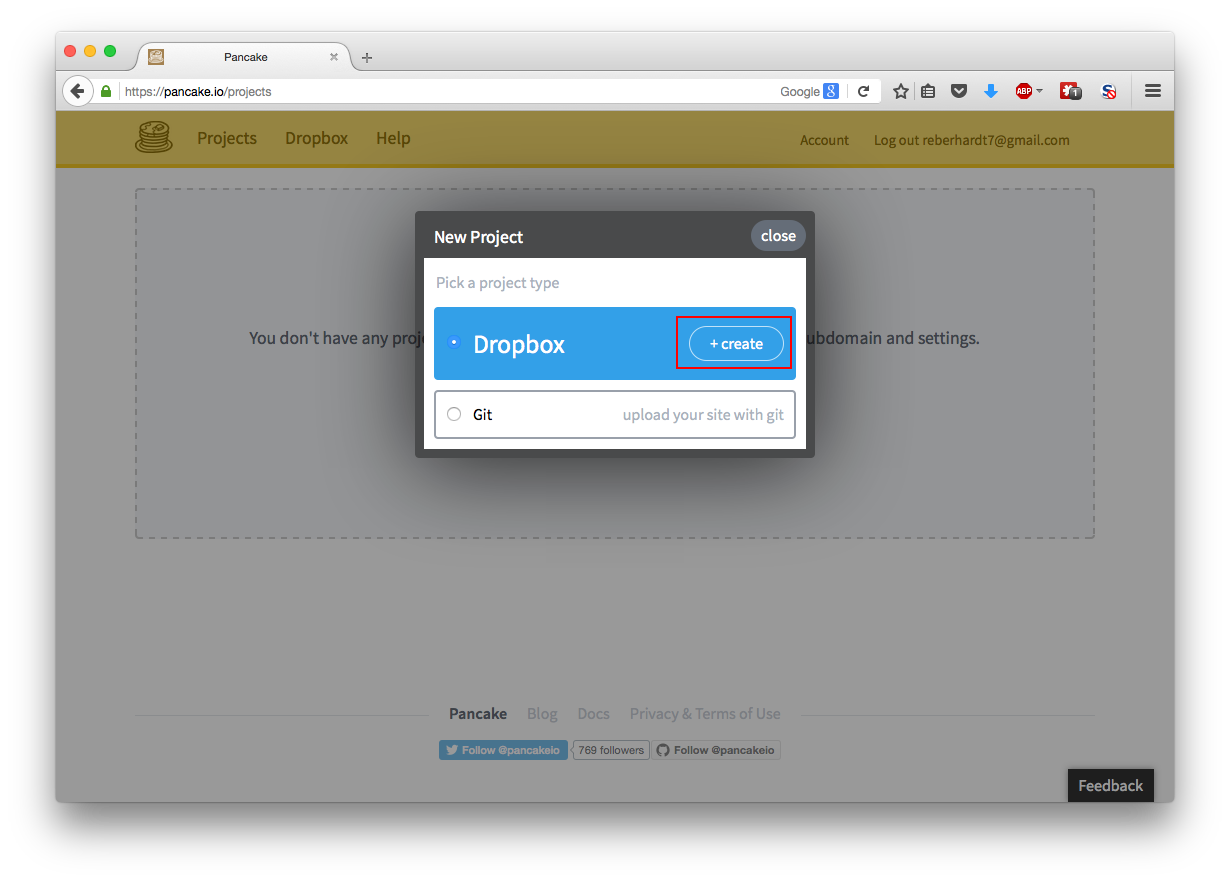
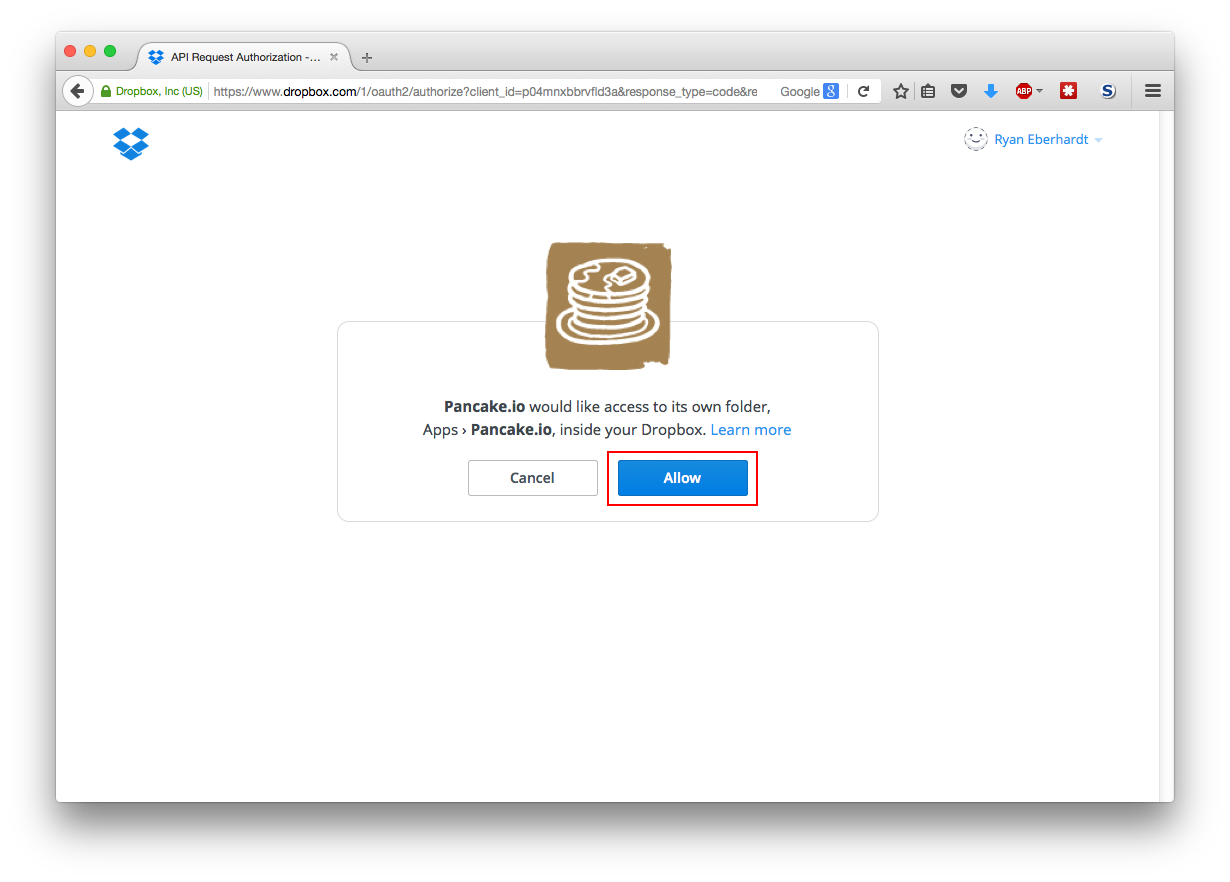
First, create a Dropbox account, or log in with an existing one. Then, visit pancake.io and click “Sign up.” Go ahead and create an account. Then, once you are logged into Pancake, click “Create a new project.” For the project type, select “Dropbox,” and at the Dropbox prompt, allow Pancake to access its own folder inside your Dropbox. Once that is done, you might need to click “Create a new project” again.
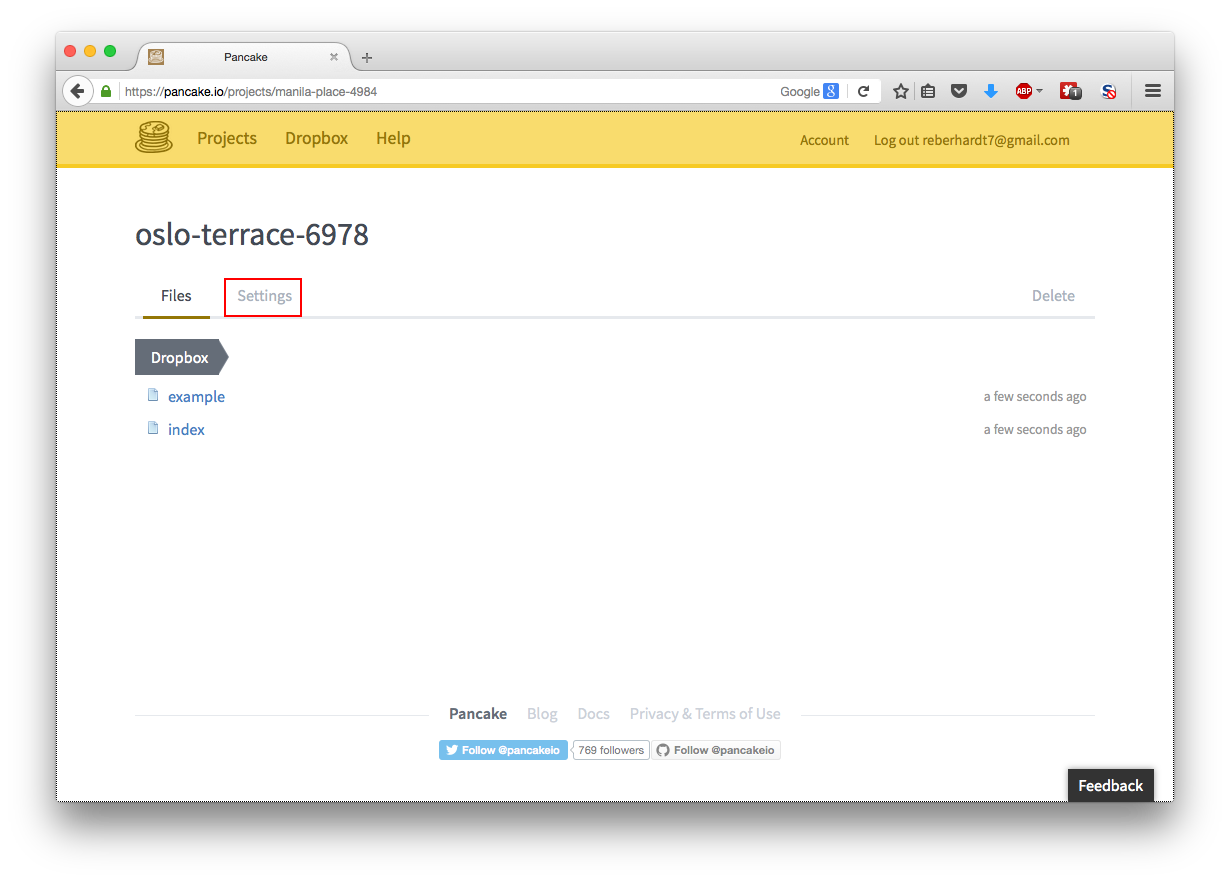
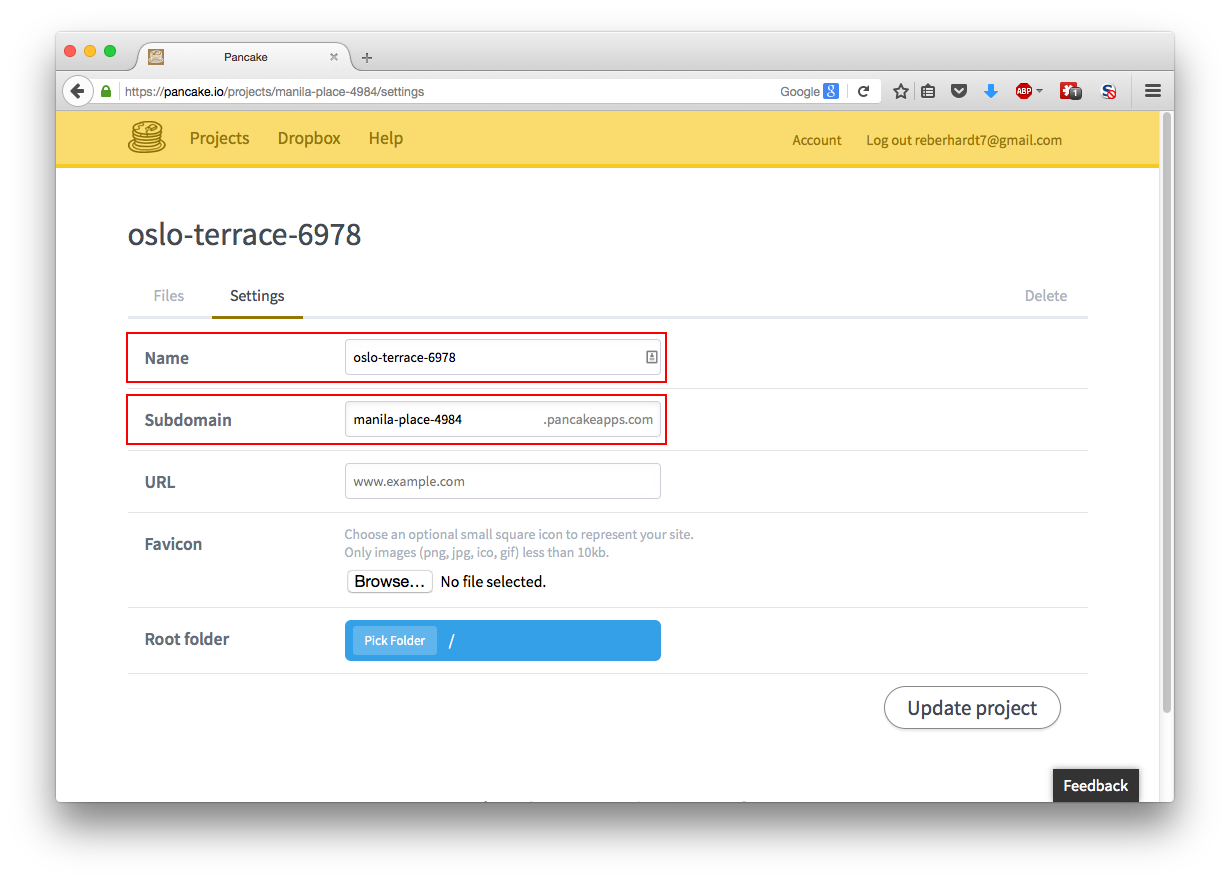
Once at your Pancake project page, head to the Settings tab. You can rename your
project, but more importantly, you can change the subdomain where it is located.
This is the website address you will enter to visit your site. Change it if you
like (though be aware that you can only enter a .pancakeapps.com subdomain).
Be sure to write down the entire subdomain name (including .pancakeapps.com).
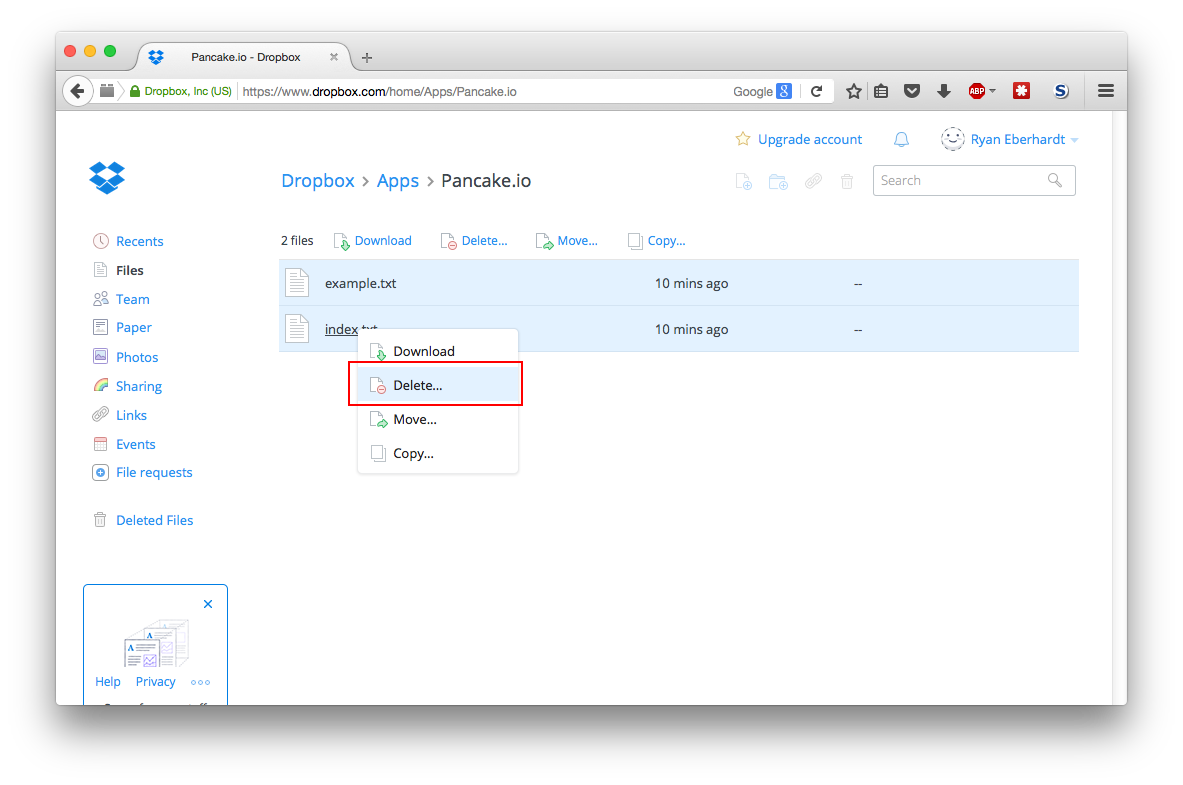
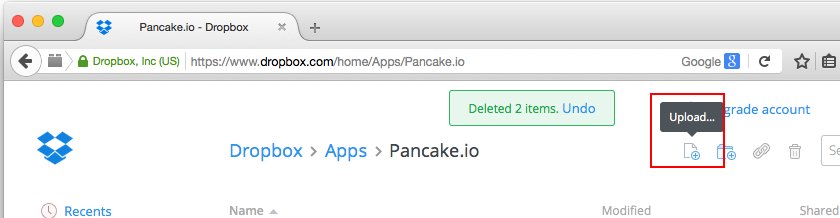
When you have changed the Pancake settings, head over to Dropbox. Navigate to Apps > Pancake.io. Right click the files that are there and delete them. Then, click the “upload” icon, and upload all of the files from your website folder on your computer.

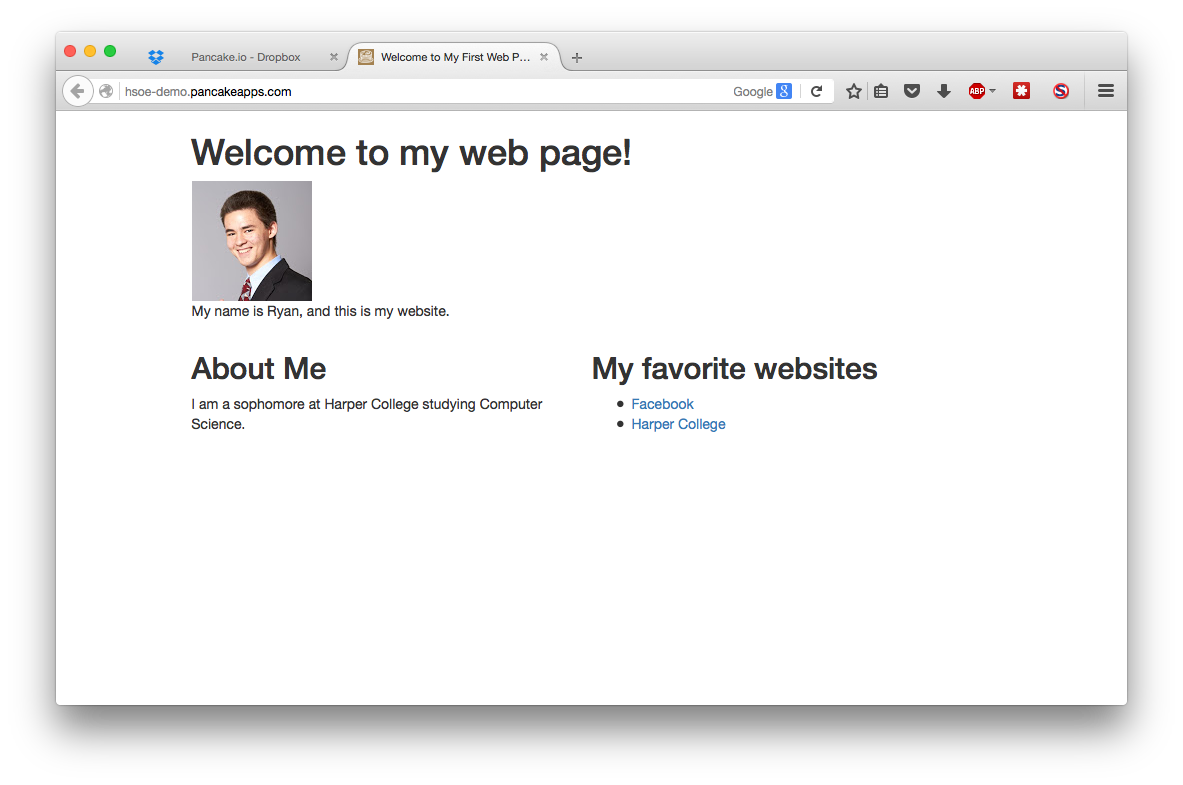
Now enter the subdomain name that you wrote down earlier in your browser address bar. Your website should appear!
Note that if you change your website files on your computer, you will need to upload them again to Dropbox.
Where to go from here
This has been just a brief exposure to the world of web development. You might not feel like you have everything down (in fact, you probably shouldn’t), but hopefully you now have a sense of how to approach building websites.
Web development is just like anything else in that the only way to get better at it is to practice. Some people believe that if they think hard enough, all this will make sense, but that is not the case! The only real way to get a strong sense of what you’re doing is to practice it a lot. Try making yourself a personal website. Try making a website for a club, or for a family member, or for a small business you know that doesn’t have a website yet. If you don’t know where to begin in terms of page design, try checking out other similar websites to see what information they display, how they lay out the page, and so on. Try Googling “best personal website designs” or “best company website designs” for inspiration. You might feel intimidated by what comes up, but keep in mind that if you spend enough time emulating the best, you’ll soon get good yourself!
There are many great web development tutorials on Scotch, TutorialsPoint, Codrops, TutsPlus, and other websites. If you have something in mind that you’re not sure how to do, just try Googling it, and 99% of the time, someone has had the same problem as you in the past :) For example, “HTML mobile navbar” or “HTML embed YouTube video” or “CSS pretty buttons” all return lots of helpful tutorials and blog posts. If you ever run into trouble or aren’t quite sure what something means and Google results are turning up a bunch of terminology that you don’t understand, just shoot me an email and I would be more than happy to help!
Web development is a useful skill and a powerful means of expression. I hope you enjoy working with it!
I'm Ryan, and I would love to hear from you. Send me an email or leave a comment below!

Interested in reading more articles like this one? Join my mailing list and I'll email you when I publish a new post! I typically post less than once a month.